


How to Set Perfect White Balance on your photographs


Suppose you're a photographer, amateur or professional, and one of your primary concerns is getting the perfect white balance in your photographs. White balance is the camera setting that determines what color white will look like in your photo.
This is important because different lighting situations can change how white looks in your photos. This article will show you how to set the perfect white balance for any lighting situation!
What do you Mean by White Balance in Photography?
In photography, white balance is a term that is used to describe the color temperature of the light sources in your scene. The color temperature of a scene can affect your photos' overall look and feel, so it's important to understand how to set the white balance in your camera.
There are a few different ways to do this, but the key is to experiment and find what works best for you and your photography style. Some common white balance problems include images that are too warm or cool, images with an unwanted color cast, and images that look flat or lifeless.
Why is it Important to Set Perfect White Balance?
White balance is one of the most important factors in photography, yet beginners often overlook it. Proper white balance ensures that your photos look natural and accurately represent the scene you are trying to capture. Without it, your photos can look washed out or have an unwanted color cast.
There are several ways to set a white balance, but the key is to experiment and find what works best for you and the type of photos you're taking. The best way to learn is by trial and error, so don't be afraid to experiment with your photo!
What is In-camera White Balancing?
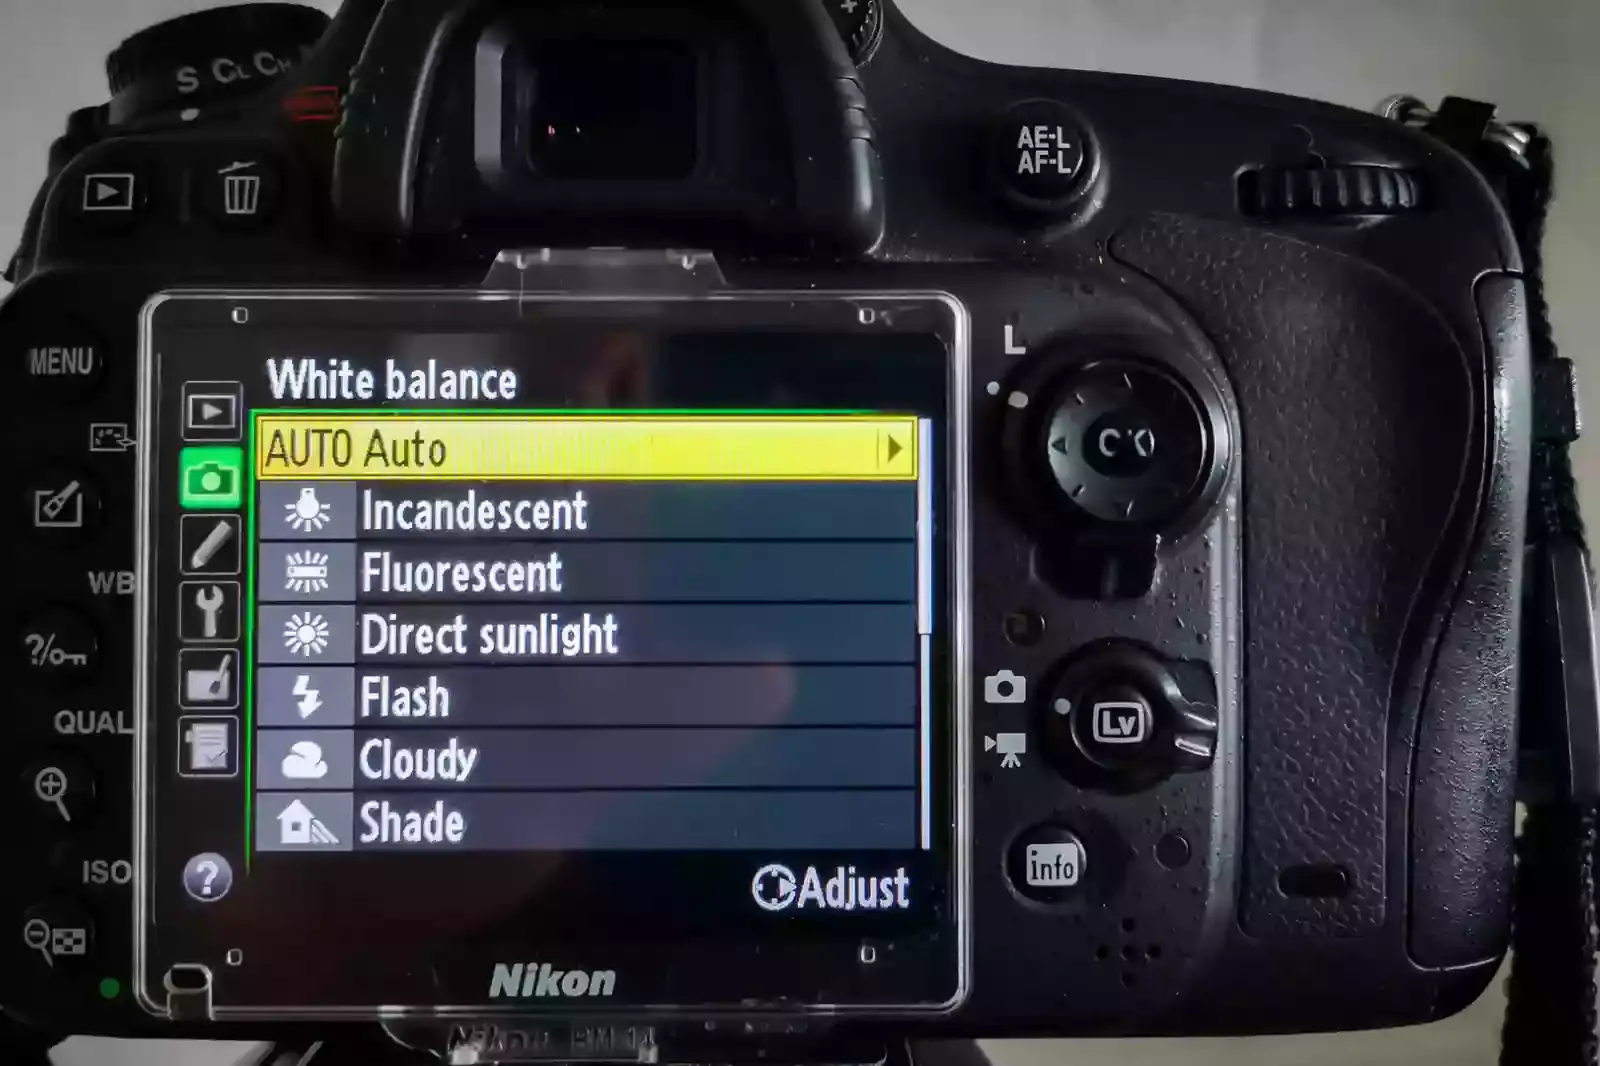
In-camera white balancing is a process that helps ensure your photos have accurate colors. This is especially important when taking photos in different lighting conditions, indoors or outdoors. Many modern cameras have an auto white balance feature that does this automatically for you. But if you want more control over your colors, you can manually set the white balance yourself. Here's how to do it:
1. Select your camera's white balance mode. This is usually done via a menu on the camera's LCD screen. Look for a setting that says " WB" or "White Balance."
2. Choose the desired color temperature. This is typically measured in Kelvin (K). Common settings are 5500K (daylight), 4000K (cloudy), and 6500K (shade).
3. Take a photo of the new setting and check the results. If the colors look off, adjust the white balance until they look natural.
What is White Alancing While Editing?
White balancing is adjusting the colors in your image to ensure that the whites are truly white. This is important because if the whites are not balanced, your whole image will appear off.
You can white balance your images in Photoshop by going to the "Image" menu and selecting "Adjustments." Then, select "Color Balance." You can use the sliders to adjust the colors until the whites look right.
How to Set White Balance Using Presets?
If you're new to photography or want to ensure, your photos consistently come out with the perfect white balance, using presets is a great way to go. Presets are essential "recipes" for getting the perfect white balance in different lighting situations, and all you have to do is follow the instructions.
Much different white balance presets are available online, but our favourite is the "Nasim Mansurov White Balance Preset Pack." This pack includes 12 different white balance presets for various lighting conditions, and each one is easy to use with just a few clicks.
Once the preset pack is downloaded, open up Lightroom and import your photo. Then, go to the Develop module and find the White Balance section. You can select one of the Nasim Mansurov presets from the drop-down menu. And that's it! Using these white balance presets, you can quickly and easily get the perfect white balance for any photo.
How to Set White Balance in your Photos in Lightroom?
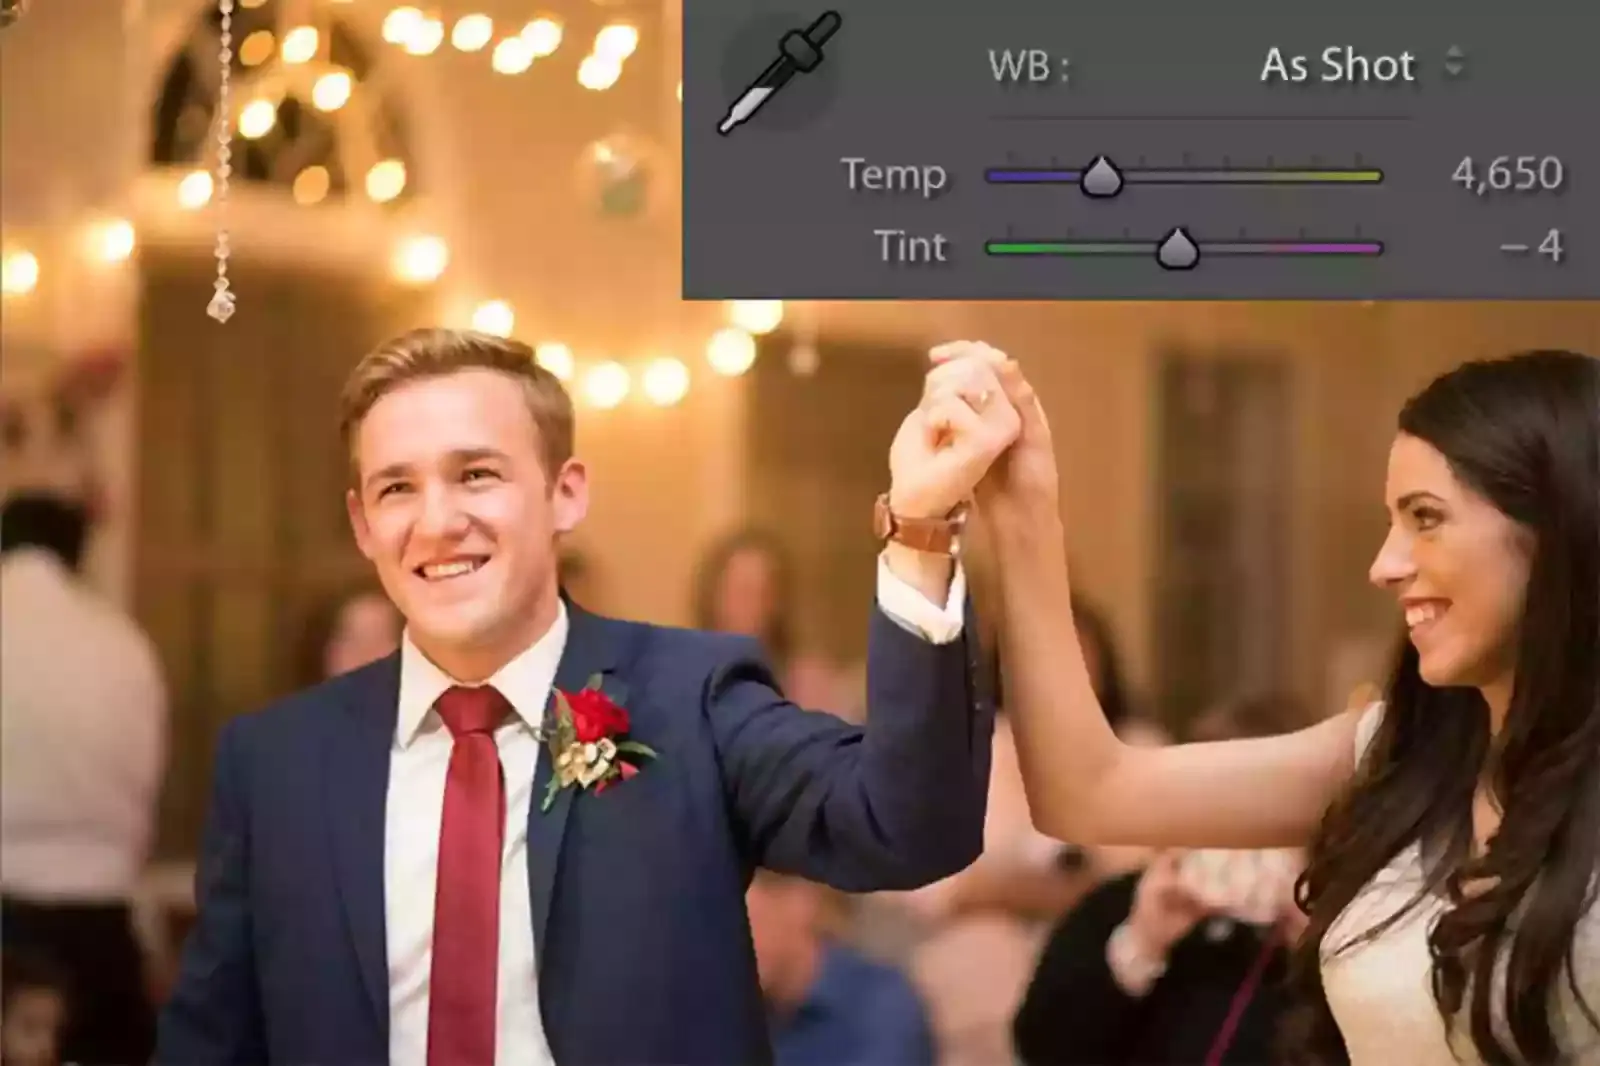
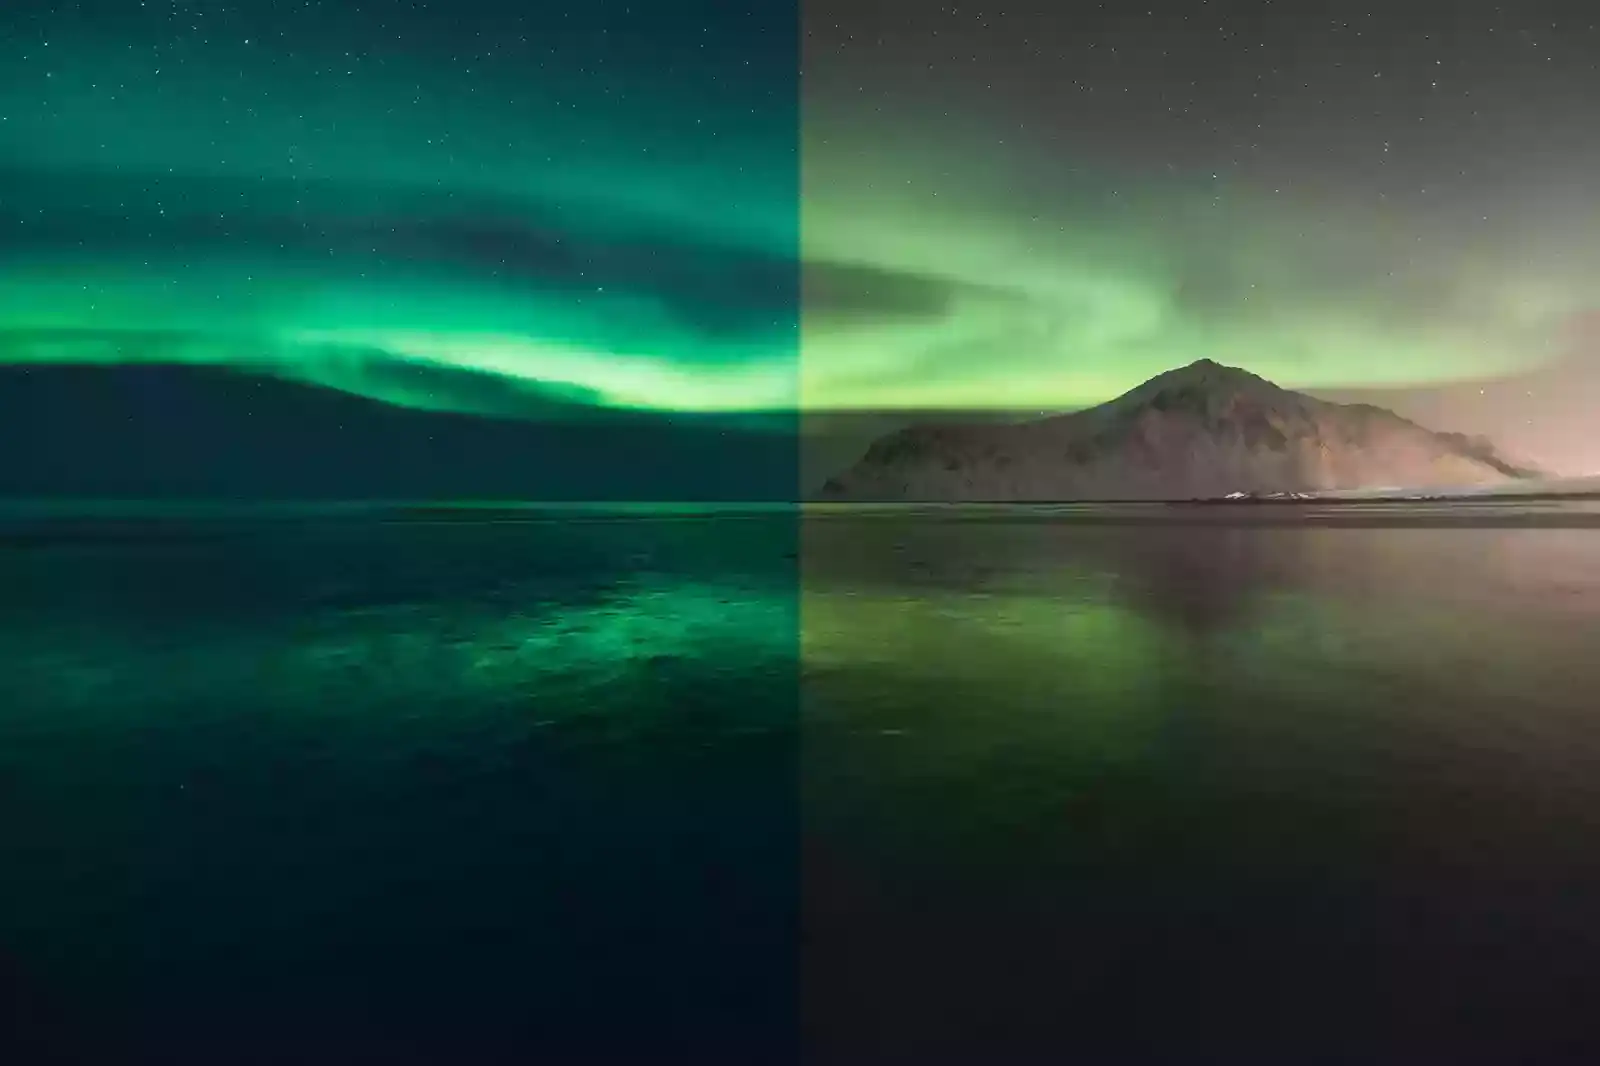
Setting the perfect white balance in your photos can differentiate between a good photo and a great one. But what is white balance, and how do you set it? White balance is the desired color temperature of your photo. It's measured in Kelvin and determines how "warm" or "cool" your photo will look.
A warmer photo will have more yellow/red tones, while a cooler photo will have more blue tones. You can manually set your white balance or let your camera do it. If you're shooting in RAW (which you should be), you can adjust your white balance later in Lightroom or another post-processing program.
To set your white balance manually, find the WB button on your camera. You'll usually see a few different options, like "Auto," "Daylight," "Shade," "Tungsten," etc. Choosing one of these will usually get you close to the correct white balance. If you're shooting in JPEG, it's best to let your camera handle the white balance.
How to use White Balance for Different Effects Creatively?

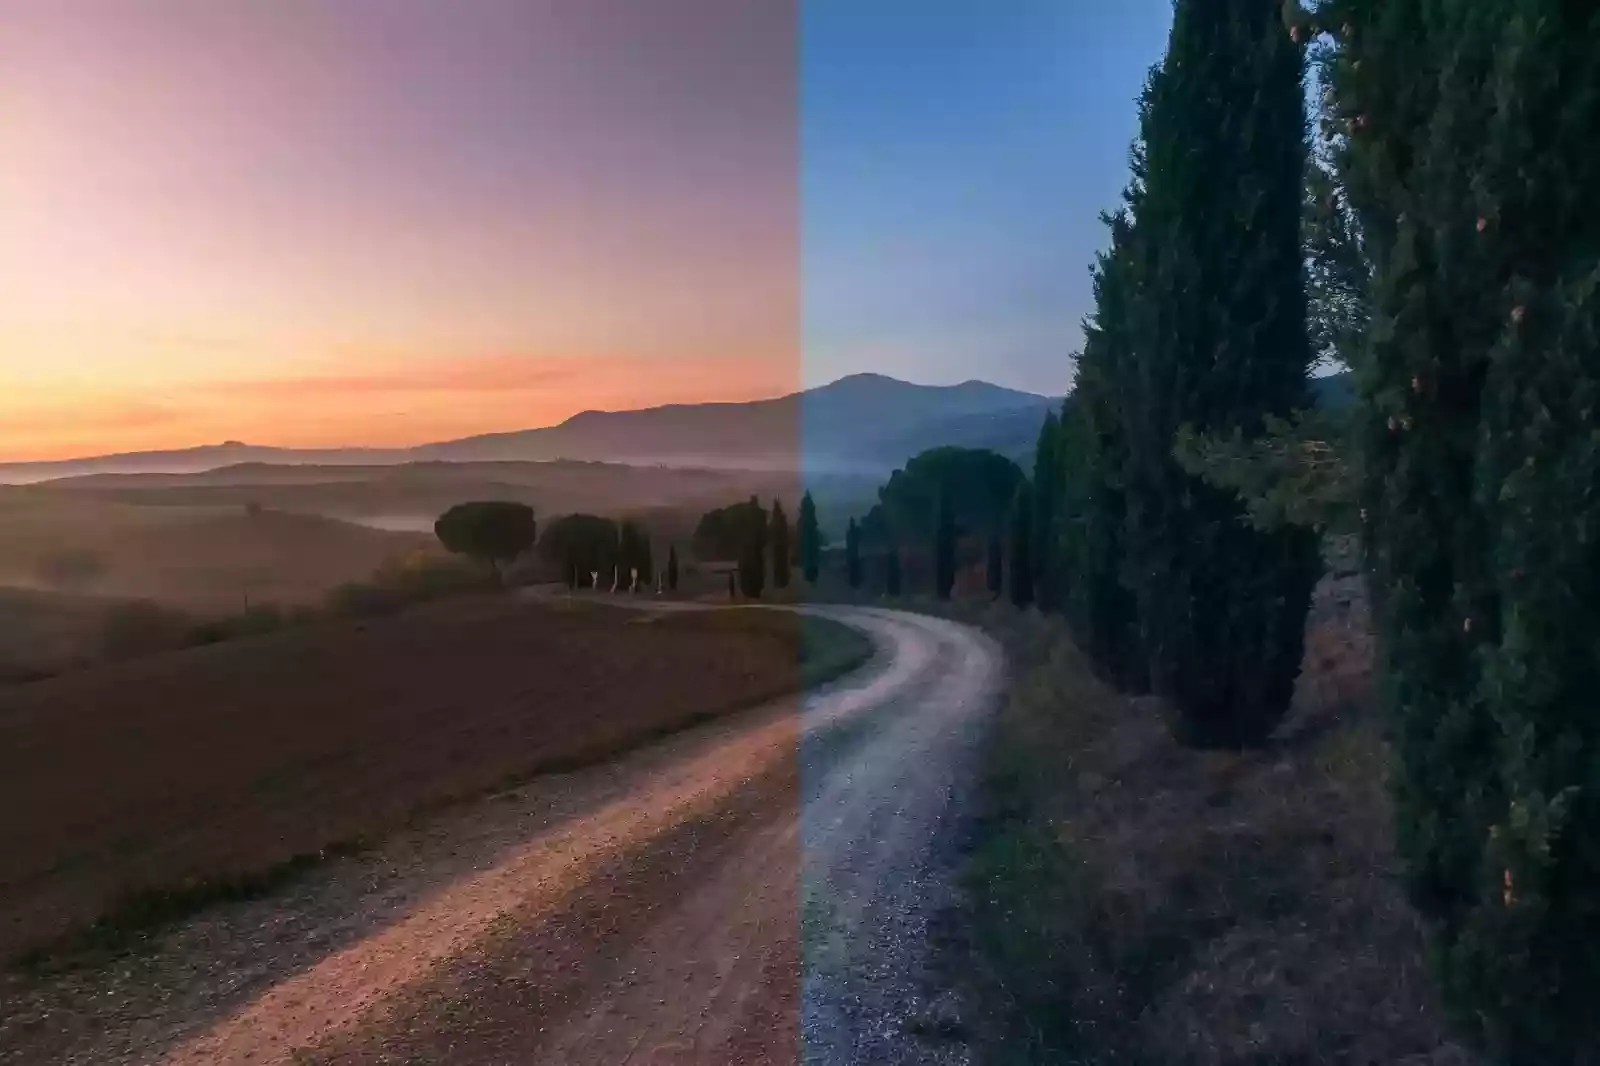
Different lighting conditions can give your photos different color casts. By adjusting the white balance, you can change the overall tone of your photo. If you want to add a warm effect to your photo, try using a lower white balance setting. This will make the colors in your photo appear more saturated. If you want to add an cool effect to your photo, try using a higher white balance setting.
This will make the colors in your photo appear more muted. You can also use white balance to correct color casts caused by different light sources. For example, if you are photographing under fluorescent lights, you may want to use a higher white balance setting to remove the greenish cast from the light.
7 Tips to Get the Perfect White Balance in Your Photos

If you're a photographer, you know how important it is to get the perfect white balance in your photos. Here are 7 tips to help you achieve that:
1. Take a Sheet of Paper With You while editing
If you're editing your photos and having trouble getting the perfect white balance, here's a tip that can help. Take a sheet of white paper with you while you're editing. When you hold it up to your photo, it will help you to see what areas are too dark or too light. You can then adjust your photo accordingly.
This is a great way to get the perfect white balance in your photos without spending hours fiddling with the settings. So next time you're editing, take a paper with you!
2. Use a Lens Filter while clicking photos
Achieving the perfect white balance in your photos can be tricky, but it is possible with some practice. One of the easiest ways to achieve the perfect white balance is to use a lens filter. Lens filters are designed to correct the colors in your photos to appear more accurate. There are various lens filters available on the market, so choosing one compatible with your camera is important. You can usually find this information on the packaging of the filter.
Another way to achieve the perfect white balance is by manually adjusting your camera's settings. Most cameras have a white balance setting that you can adjust. If you are unsure about changing the white balance setting on your camera, consult your camera's manual or look up tutorials online. Once you have achieved the perfect white balance in your photos, you will notice that they appear more vibrant and colors are more accurate.
3. Manually Adjust In-Camera Using Kelvin feature
One of the most common problems photographers face is getting the perfect white balance in their photos. White balance is the term used to describe the overall color tone of a photo. If your photo has a warm color tone, the colors are yellow or orange. If your photo has a cool color tone, the colors are more blue or purple.
The first step to getting the perfect white balance is understanding what Kelvin is and how it works. Kelvin is a unit of measurement used to describe color temperature. The lower the Kelvin number, the cooler the colors will be. The higher the Kelvin number, the warmer the colors will be.
Most digital cameras have a Kelvin feature that allows you to adjust the color temperature of your photos manually. To use this feature, you will need to know what Kelvin temperature you want your photo to be. If you are still determining what Kelvin temperature to use, you can follow a few general guidelines. For example, if you are taking a photo outside on a sunny day, you will want to use a higher Kelvin temperature, so your photo does not look too blue or purple.
4. Learn More About Lighting effects and features
One of the most important aspects of photography is getting the perfect white balance. White balance is adjusting the colors in your photo to ensure that white is genuinely white. This can be tricky, but it is essential to getting great-looking photos.
You can adjust the white balance in your photos in a few different ways. The first way is to use the white balance settings on your camera. Most cameras have an automatic setting that will do an excellent job of correcting the white balance for you. However, you must adjust the settings if you are shooting in manual mode.
Another way to adjust the white balance in your photos is to post-process them using photo editing software. This can be more time-consuming, but it allows you to fine-tune the colors in your photo to get them exactly how you want them. If you are having trouble getting the perfect white balance in your photos, experiment with different settings and see what works best. There is no one right way to do it!
5. Use the White Balance Selector in any editing app
If you want the perfect white balance in your photos, one of the best things you can do is to use the white balance selector in any editing app. This will help you adjust the colors in your photo to look more natural. You can also try using a white balance card when taking photos. This will help you to get the perfect exposure for your photo.
When editing your photos, try to use the same white balance setting you used when you took the photo. This will help to keep the colors in your photo consistent. If you are having trouble getting the perfect white balance, don't hesitate to ask for help from a professional photographer. They will help you get the perfect results for your photos.
6. Calibrate Your Camera Screen
Calibrating your camera's screen is one of the best ways to ensure accurate white balance in your photos. By doing this, you can be sure that the colors in your photos will be accurately represented. You can calibrate your camera's screen in a few different ways. One way is to use a calibration tool, such as the ColorMunki Display. This tool will help you adjust the colors on your screen to be accurate.
Another way to calibrate your camera's screen is to use a white balance card. This card can be placed in front of your lens while taking a photo. By doing this, you can be sure that the colors in your photo will be accurate. Once you have calibrated your camera's screen, you should take some test shots. By doing this, you can be sure that the colors in your photos are accurate.
7. Readjust Your Eyes
Many people must realize that our eyes naturally adjust to different color temperatures. This is why a white object can look like it has a pink or blue tint when viewed in different lighting. To get the perfect white balance in your photos, you need to readjust your eyes to the light source's colour temperature. You can do this by holding a white piece of paper up to your eye and then looking at the light source.
If the light source is cool (bluish), you should see a pink tint on the paper. If the light source is warm (yellowish), you should see a blue tint on the paper. Once you've readjusted your eyes, take a photo of a white object in the same lighting. You should now see that the object appears perfectly white in your photo!
White Balance is Very Crucial for Getting Good Pictures

1. White balance is a very crucial element in photography. It is responsible for ensuring that your photo's colours are accurate. If the white balance is off, the colors in your photo will be inaccurate. This can ruin a photo.
2. There are a few different ways to set the white balance. The easiest way is to use your camera's auto white balance setting. This usually gives you good results. However, you can set it manually if you want more control over the white balance.
3. To set the white balance manually, you will need to know what color temperature you want to use. Color temperature is measured in Kelvin. For most photos, you will want to use a color temperature between 2500 and 9000 Kelvin.
4. Once you know what color temperature you want, you can set your camera to that temperature. Most cameras have a white balance menu where you can select the color temperature you want to use.
5. If you still have trouble getting the perfect white balance, some great software programs can help you. Adobe Lightroom and Apple Aperture are two of the best options available.
Conclusion
As you can see, setting the perfect white balance on your photographs is not difficult, but it takes a little practice. Following the tips in this article, you should get great results in no time. So experiment with different settings until you find the one that works best for you.
FAQ's
What is white balance, and why is it important?
Your camera’s white balance setting determines what the camera interprets as white in your scene. This is important because if your camera interprets the wrong color as white, your whole photo will have a color cast. For example, if your camera interprets a blue sky as white, your photo will have a blue tint.
How do I know if my photos have a color cast?
A color cast is when a photo has an overall tint of one color. To check for a color cast, look at your photo and see if the colors look “off” or unnatural. If they do, your photo probably has a color cast.
How do I fix a color cast?
If your photo has a color cast, you can usually fix it by adjusting the white balance setting on your camera. Most cameras have several white balance presets that you can choose from, or you can manually adjust the white balance to get the perfect result.
What are some common causes of color casts?
There are many potential causes of color casts, but some of the most common are lighting conditions and camera settings. Incandescent light, for example, tends to give photos a yellowish tint, while fluorescent light can give photos a greenish tint. If your camera’s white balance is set to the wrong preset or is not properly calibrated, it can also cause color casts.
How can I prevent color casts in my photos?
The best way to prevent color casts is to be aware of the potential causes and to take steps to avoid them. When you’re shooting in mixed lighting, for example, try to use a white balance preset that is designed for that type of light. If you’re not sure what white balance preset to use, you can also shoot in RAW mode, which gives you more flexibility when it comes to correcting color casts in post-processing.
What is the best setting for white balance?
The best setting for white balance depends on the specific lighting conditions in which the photo was taken. Generally, the goal is to achieve a natural-looking color balance that accurately reflects the colors in the scene. One common approach is to use the "auto white balance" setting on your camera or image editing software, which will adjust the color balance automatically based on the lighting conditions.
.webp)

.webp)

.webp)

.webp)
.webp)


