


How To Remove Background From Pictures In PowerPoint


Are you looking to elevate your presentations and make them more visually appealing? Learning how to remove background from pictures in PowerPoint is a game-changer for anyone who wants to create stunning slides. Whether you’re a student, professional, or educator, mastering this skill can help you present your ideas more effectively.
With just a few simple steps, you can transform ordinary images into captivating visuals that stand out. Using the PowerPoint remove background image feature allows you to highlight key elements and eliminate distractions from your slides. This tool empowers you to take control of your images, ensuring they align perfectly with your message.
Imagine presenting a product image without any clutter or background noise—your audience's attention will be solely focused on what matters most. In this blog post, we will guide you through the process of removing backgrounds in PowerPoint step-by-step. By the end, you’ll have the confidence and knowledge to enhance your presentations effortlessly. Let’s dive in and unlock the potential of your visuals together!
Why Remove Backgrounds in PowerPoint?
Removing backgrounds from pictures in PowerPoint is a crucial skill for creating visually appealing presentations. By utilizing the PowerPoint remove background image feature, you can enhance the focus on your content and eliminate distractions. This process not only improves the professionalism of your slides but also allows for greater design versatility.
Whether you're preparing a business report or an academic project, mastering how to remove background in PowerPoint can elevate your presentation and captivate your audience. In this guide, we'll explore the steps and benefits of removing backgrounds to help you create stunning visuals effortlessly.
1. Enhanced Visual Appeal
A clean background can significantly improve the aesthetic quality of your slides. By removing distracting elements, you can draw attention to the main subject of your images. This clarity enhances the overall look of your presentation and helps maintain audience engagement.
2. Improved Focus on Content
When you remove backgrounds, you eliminate unnecessary details that can divert attention from your message. This allows your audience to focus on the key points and visuals you want to convey, making your presentation more effective and memorable.
3. Professionalism
Using images with removed backgrounds gives your slides a more polished and professional appearance. Whether you're presenting in a corporate environment or an academic setting, a well-designed slide can enhance your credibility and authority.
4. Versatility in Design
Removing backgrounds allows for greater flexibility in design. You can easily place your images against different backgrounds, adjust their sizes, or combine them with other elements without worrying about clashing visuals. This versatility can help you create unique and impactful designs.
5. Brand Consistency
For businesses, maintaining brand consistency is crucial. By using images with clean backgrounds, you can ensure that all visuals align with your brand’s style and messaging. This consistency helps reinforce your brand identity and creates a cohesive look across all your presentations.
6. Easier Integration with Other Tools
Images with removed backgrounds can be easily integrated into various marketing materials and digital platforms. Whether you’re using the images for social media, reports, or promotional content, having a transparent background simplifies the process.
In summary, removing backgrounds from pictures in PowerPoint is not just a cosmetic enhancement; it plays a vital role in creating effective, professional, and engaging presentations. This simple yet powerful feature can transform the way you communicate ideas and connect with your audience.
How to Remove Background From Pictures in PowerPoint
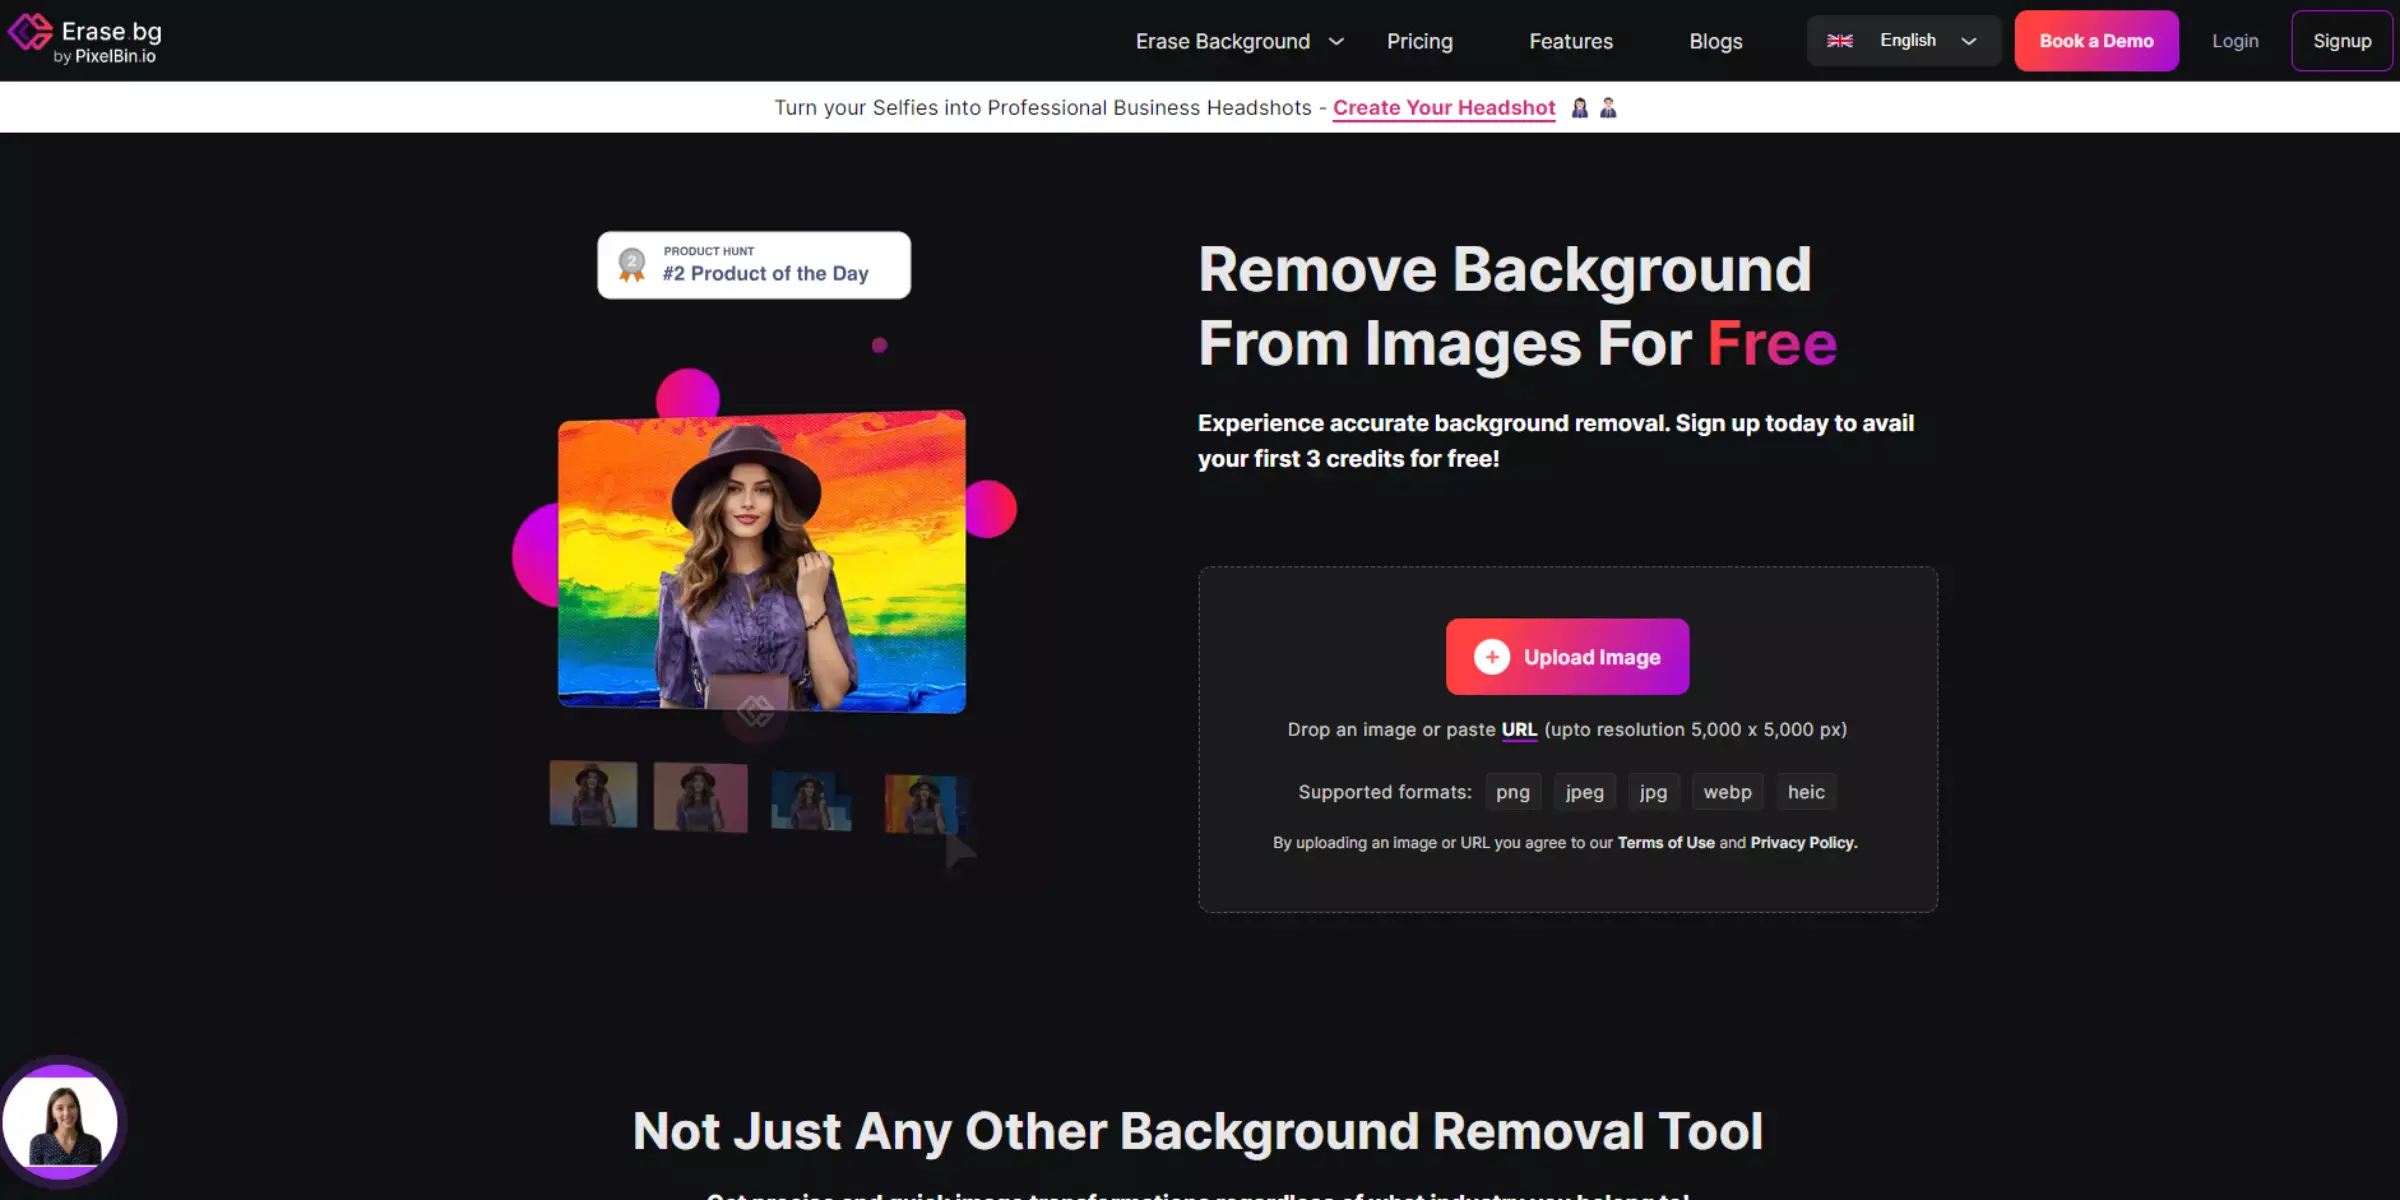
Removing backgrounds from pictures in PowerPoint can significantly enhance your presentations. To simplify this process, we recommend using Erase.bg, an efficient tool for background removal in PowerPoint.
With its user-friendly interface and powerful AI capabilities, Erase.bg allows you to effortlessly eliminate unwanted backgrounds, ensuring your images look professional and polished. By integrating Erase.bg into your workflow, you can achieve stunning visuals in just a few clicks, making it easier to focus on your content.
Whether you're working with product images or personal photos, this tool ensures a seamless background removal experience, allowing you to create captivating slides. In the following sections, we’ll guide you through the steps to effectively use Erase.bg for your PowerPoint presentations.
Step 1 - Click on your picture to select it.
Step 2 - You’ll see the Picture Format tab at the top. Click here.
Step 3 - Click on Remove Background. Now PowerPoint will automatically select parts of the picture it considers as the background.
Step 4 - As you can see in the above picture, PowerPoint has highlighted the parts it considers as background in purple. PowerPoint may also cover areas that you may not want to remove. For example, the picture above has captured some parts of the laptop, the desktop behind it, and some other elements I want to keep.
Step 5 - We have to clean those areas that PowerPoint has caught as background. And to do that, you must click on Mark Areas to Keep, which is at the top left corner.
Step 6 - Now, you can draw a line or circle the areas you want to keep. Or you can click and drag the pencil to keep the elements you want, as shown in the picture below.
Step 7 - Once you are done making the changes and get the desired result, click on Keep Changes. And that’s it; you have successfully removed the background from your image. If you still think you need to make some changes, you can follow the same steps and get your image ready as you like it.
Removing Background From a Picture in PowerPoint With Set Transparent Color Tool: Step-by-Step Guide
Removing the background from a picture in PowerPoint can transform your slides and make them visually striking. One effective method to achieve this is by using the Set Transparent Color tool.
This feature allows you to easily eliminate unwanted backgrounds and emphasize your main subject, creating a more professional look for your presentations. Whether you're preparing a business pitch or a school project, knowing how to use this tool effectively can elevate your work.
By following our step-by-step guide, you'll learn how to remove backgrounds seamlessly, ensuring that your images blend perfectly with your slide design. With a few simple clicks, you can enhance your visuals and capture your audience's attention. Let’s dive into the process of using the Set Transparent Color tool to achieve stunning results in PowerPoint!
Step 1 - As you did in the previous step, first upload your picture in PowerPoint and select it.
Step 2 - Click on Picture Format.
Step 3 - You’ll find the colour tab and click on the dropdown symbol.
Step 4 - Now, PowerPoint will show you different options, but you’ll have to go to the bottom of the page and click on Set Transparent Color.
Step 5 - Now click on the background of the picture you want to remove. Once you do that, the tool will remove the background colour.
PowerPoint Background Removal Tools May Not Work Well in These Cases.
While PowerPoint offers handy tools for background removal, there are specific situations where these tools may perform differently than expected. Understanding these limitations can help you prepare better and explore alternative solutions, such as using Erase.bg for more complex tasks.
1. Complex Backgrounds
PowerPoint's background removal tools can need help with images that have intricate or busy backgrounds. If the background contains various colors, patterns, or textures, the tool may inadvertently remove parts of the subject or fail to eliminate the background. In such cases, a dedicated background removal tool like Erase.bg can provide more accurate results.
2. Low Contrast Between Subject and Background
When there is little contrast between the foreground subject and the background, PowerPoint's automatic removal feature may misidentify parts of the image. For example, a light-colored object on a pale background can lead to unwanted results. Using Erase.bg can help ensure that the background is removed effectively, regardless of color similarities.
3. Shadows and Reflections
Images with strong shadows or reflections can confuse PowerPoint's removal tools. Shadows may be interpreted as part of the background, leading to incomplete removal. If your image has these elements, consider using a specialized tool that can handle such complexities with precision.
4. Detailed Edges
Images with fine details, like hair or intricate patterns, can be difficult for PowerPoint to process. The tool may create jagged edges or leave unwanted artifacts around the subject. For cleaner, more professional results, Erase.bg can offer a smoother finish that retains detail without compromising quality.
5. Uncommon Image Formats
PowerPoint supports various image formats, but if you're working with less common types, you might need help with the background removal tool. Ensure your images are in widely accepted formats (like JPG or PNG), or consider converting them before attempting background removal in PowerPoint.
Removing Image Backgrounds Using AI Tools: Are These Tools Really Better Than PowerPoint?
In recent years, AI-powered background removal tools have emerged as game-changers in the field of image editing, offering capabilities that traditional software like PowerPoint may struggle to match. Here’s an in-depth look at why AI tools, such as Erase.bg, are often considered superior for removing image backgrounds compared to PowerPoint:
1. Accuracy and Precision
AI tools leverage advanced algorithms to identify and remove backgrounds from images accurately. They can distinguish between foreground subjects and backgrounds with complex elements like fine details, shadows, and reflections, producing cleaner and more precise results. In contrast, PowerPoint's tools, while convenient, may offer a different level of accuracy, especially with challenging images.
2. Automation and Efficiency
AI background removal tools automate the process, allowing users to achieve professional-quality results with minimal effort. They can handle bulk processing of images quickly, making them ideal for projects requiring efficiency and consistency. PowerPoint, on the other hand, may require more manual adjustments and may need to be more efficient for large volumes of images.
3. User-friendliness and Accessibility
AI tools are designed to be user-friendly, with intuitive interfaces that make background removal accessible even to those without extensive design skills. They often offer one-click solutions that streamline the editing process. While PowerPoint provides basic background removal tools, AI tools like Erase.bg offer a more intuitive and seamless experience for users of all skill levels.
4. Handling Complex Backgrounds
AI tools excel in handling images with complex backgrounds, such as those with multiple colors, patterns, or textures. They can accurately differentiate between foreground subjects and intricate backgrounds, ensuring that details are preserved. PowerPoint’s tools may struggle with such complexities, leading to less polished results.
5. Consistency and Quality
AI tools deliver consistent results across different types of images, maintaining high-quality standards throughout. They can achieve smooth edges and clean transitions between foreground and background elements, enhancing the overall visual appeal. While PowerPoint can achieve decent results for simpler images, AI tools offer superior quality and reliability for professional applications.
6. Advanced Features and Customization
Many AI tools offer advanced features, such as the ability to fine-tune the removal process with sliders and additional options. Users can adjust the sensitivity and refine edges to achieve the desired effect. PowerPoint lacks these customization options, which can limit the user's control over the final output.
7. Cloud Integration and Accessibility
AI background removal tools often operate in the cloud, allowing users to access their projects from any device with an internet connection. This flexibility is a significant advantage over PowerPoint, which may require specific software installations and can limit accessibility. Users can easily share and collaborate on projects using AI tools.
8. Compatibility with Various Formats
AI tools typically support a wide range of image formats, making it easier to work with different types of images. Whether you're working with PNG, JPG, or others, AI tools can often handle them all seamlessly. PowerPoint, while versatile, may have limitations when it comes to certain formats or file types.
9. Cost-Effectiveness for Professionals
For professionals who regularly need to remove backgrounds, investing in an AI tool can be more cost-effective in the long run. The time saved and the quality of work produced can justify the expense. PowerPoint may be included in software packages, but its background removal capabilities need to meet professional standards.
10. Constant Updates and Improvements
AI tools are continually updated with new features and improvements based on user feedback and advancements in technology. This ongoing development ensures that users have access to the latest and most effective tools for background removal. PowerPoint updates tend to focus on overall software enhancements rather than specific editing features.
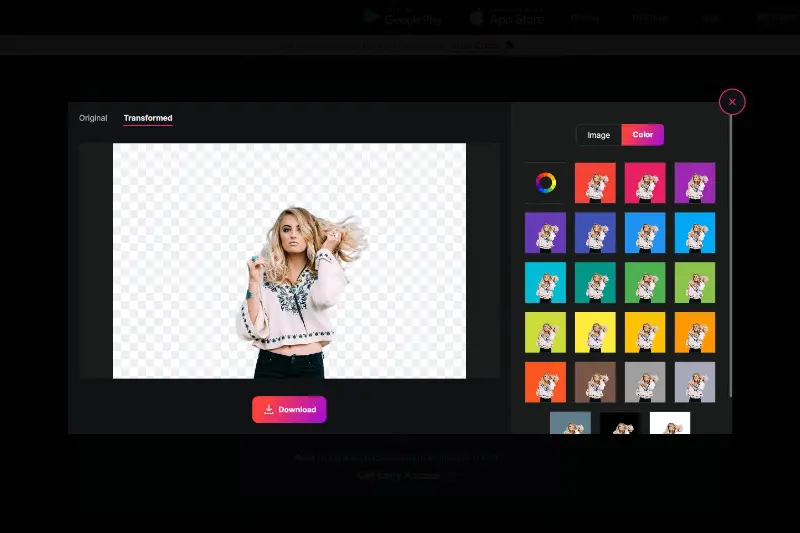
Step 1 - Go to the Erase.bg website and download the app from the Apple or Android store.
Step 2 - Once the download is complete, upload the photo you want to remove the background, and within seconds, the app will remove the background.

Step 3 - If you want to add other colors or elements, click on the edit tab, and the app will give you different editing options.
Is There Any Other Way to Make PowerPoint Pictures Stand Out?
Making pictures stand out in PowerPoint can elevate your presentations and engage your audience more effectively. Here are several strategies to enhance your images beyond just removing the background:
1. Use High-Quality Images
Start with high-resolution images to ensure clarity and professionalism. Blurry or pixelated images can detract from your message, so sourcing high-quality visuals is crucial.
2. Apply Creative Effects
PowerPoint offers various artistic effects that can enhance your images:
- Artistic Styles: Experiment with different styles to give your pictures a unique look.
- Picture Styles: Use preset styles like shadows, reflections, or soft edges to add depth.
3. Utilize Color Adjustments
Adjusting the color of your images can significantly impact their appearance:
- Brightness and Contrast: Modify brightness and contrast to make your images more vibrant or subdued as needed.
- Color Saturation: Increase saturation for a lively look or decrease it for a more muted effect.
4. Add Borders and Frames
Applying borders or frames around your images can help them stand out:
- Outline: A contrasting border can create separation from the background and draw attention to the picture.
- Shadow Effects: Adding shadows can create a 3D effect, making the image pop off the slide.
5. Incorporate Textures and Patterns
Adding textures or patterns can add interest to your images:
- Overlay Textures: Subtle textures can add depth without overwhelming the main subject.
- Background Patterns: Use patterns in the background to create visual interest without detracting from the picture.
6. Utilize SmartArt and Shapes
Combine images with PowerPoint's SmartArt and shapes for a cohesive look:
- Picture with Caption: Overlay shapes for captions or labels that complement your images.
- Grouping Elements: Group images with shapes to create a unified design that draws attention.
7. Employ Image Cropping Techniques
Beyond removing backgrounds, cropping can focus attention on key areas:
- Shape Crop: Use unique shapes (like circles or triangles) to crop images, making them visually distinct.
- Aspect Ratio: Maintain a consistent aspect ratio for a polished look across multiple images.
8. Implement Animation Effects
Adding animations can engage your audience and highlight images:
- Entrance Effects: Use animations like "Fade" or "Zoom" to introduce images dynamically.
- Motion Paths: Create movement that guides the viewer’s eye to the image or specific details within it.
9. Use Color Schemes and Themes
Ensure your images align with your presentation's overall theme:
- Consistent Color Palette: Use colors in your images that complement the color scheme of your slides.
- Branding: If applicable, include elements of your brand's colors or logo for consistency.
10. Leverage AI Background Removal Tools
For a more polished look, consider using AI tools like Erase.bg to remove backgrounds before inserting images into PowerPoint. This method ensures that only the essential parts of the image are visible, allowing for a cleaner design.
11. Incorporate Infographics
Transform images into infographics to present information visually:
- Data Visualization: Use charts and diagrams alongside images to convey information effectively.
- Combination of Elements: Merge images with data points for a comprehensive visual story.
Conclusion
Removing backgrounds from pictures in PowerPoint enhances your presentations and makes your content stand out. By utilizing the built-in tools effectively, along with options like Erase.bg for more complex images, you can achieve professional-looking results that elevate your visual storytelling.
FAQ's
Are There Free Photo Background Removers Other Than PowerPoint?
Yes, there are lots of free background removers other than PowerPoint. You’ll find multiple AI tools like Erase.bg, which are absolutely free.
Can I Change The Background Of A Picture With White Backdrop?
Yes, you change the background of the picture with a white backdrop and edit it to any other color you want.
Can I Remove The Background Of A Logo?
Yes, you can also remove the background of a logo. If you are using PowerPoint, you have to select the main subject, and the tool will remove the rest of the areas. And if you are using an AI background clearer tool, the app itself will recognize the subject and remove the background.
Can I Undo Image Background Removal In PowerPoint?
Yes, you can also undo the background removal. You can either press Ctrl+Z on your Windows PC or press Command Z on your Macbook to remove the changes.
Can I Make A Logo Transparent In PowerPoint?
Yes, you can make a logo transparent in PowerPoint. You make it transparent using the same set transparent color procedure.
Why Are PNG Images Not Transparent In PowerPoint?
Your PNG image may not be transparent in PowerPoint because most printers don’t accept color formats. Therefore, it’s best to use a more professional background removal tool to make your image transparent.
.webp)

.webp)

.webp)

.webp)
.webp)


