sRGB vs. ProPhoto RGB vs. Adobe RGB: Which one is Better?
Color spaces are significant in any image to describe the colors it contains. In other words, color space can be defined as how colors are organized in the picture.
There are a variety of color spaces! Are you confused about which color space you should opt for? The most common color spaces are sRGB, ProPhoto RGB, and Adobe RGB. To know which color space is better, keep reading.
What do you mean by Color Spaces?
As we all know, some colors are naturally present, while others are formed by mixing primary colors such as RGB: Red, Green, and Blue. Color spaces are the mathematical representation of a set of colors that an image-editing program can display.
These color spaces are directly associated with saturation and brightness. Many color spaces exist, including RGB, HSV, and HLS. RGB is an abbreviation for red, green, and blue that defines color as the percentage of these colors.
In contrast, other color models describe colors by their hues, saturation, and luminance. Choosing the wrong hues and color patterns can ruin and dull the images. So the Colour model plays the role of the soul in the picture. Compared to CMYK, RBG is mainly used in the digital world.
What is sRGB mode?
In 1996, with the collaboration of two giant companies, they presented a standard color space known as Standard Red Green Blue (sRGB). Later in 1999, International Electrotechnical set standards for sRGB.
Today, we can use sRGB for gaming, websites, video & photo editing, monitoring, graphic designing, and printing. Every electronic appliance has a specific sRGB, such as 100% or 125%. These percentages display how vibrant the colors will be. By this, you can know how much sRGB is used nowadays.
When sRGB was launched, other modes were available to the market, but this standard mode stands out as it assures a consistent and equal display of colors compared to other models, whether a mobile screen or laptop.
Additionally, in sRGB, you don't have to worry about the equal distribution of colors on screen as it neutralizes the hues correctly.
What is Adobe RGB?
The purpose of the launch of Adobe RGB is that there was a need for better accuracy than sRGB. If we talk about shape, Adobe RGB has the same shape as sRGB, but you can see blue and green tones in the corners.
Compared to sRGB, Adobe RGB can contain more colors and have a wide gamut. Therefore, it has more accuracy during replication from the object in front of the camera.
When you convert an image from Adobe RGB into sRGB, there will be some strange happenings as it's challenging to fit green and blue tones in a small gamut. For people who want high-quality prints, color accuracy is a must. On the other hand, it is also essential for black-and-white photos with soft gradation.
What is ProPhoto RGB?
As technology progresses, laptops, monitors, and printers have advanced too. With advanced equipment, the display and saturation of colors have become better.
When it was compared in photography which model could cover the maximum pigmentation, the clear winner was Kodaks’s ProPhoto RGB. In Prophoto, you can showcase a maximum number of colors.
Prophoto became popular among young photographers in no time as the Lightroom app launched a version that can work great with Prophoto.
When Should You use sRGB, Adobe RGB, and ProPhoto RGB?
All three color spaces are used simultaneously and under different conditions. To know the uses of all the color spaces, keep reading.
sRGB
Most people consider sRGB as default as it is easy to understand and most used. Never prefer sRGB for your working space but opt for sRGB when you edit your images. On the other hand, remember to convert the images to sRGB when exporting to the web.
ProPhoto RGB
This color space is perfect for the working area but not for outer space. By editing an image in Prophoto, you will decrease the chances of clipping colors. Before publishing, double-check that it's not a ProPhoto image.
There are chances that images can be saved in ProPhoto RGB from Photoshop. On viewing the images on a non-color-managed application, the image will look dull and horrible. Always be vigilant when dealing with clients that you don't send images in ProPhoto RGB.
By mistake, if you send ProPhoto images, and they view them on non-color-managed apps, it will create a poor impression of your professional credibility. That's the reason everyone prefers to send photos in sRGB color space.
Adobe RGB
Since Adobe RGB often doesn't match the screen, using it when exporting to the web is not preferable. It's not as small as sRGB and not significant as ProPhoto RGB. That's why it cannot even be used in the working space.
You must think that sRGB and ProPhoto RGB are more valuable than Adobe RGB. But in some cases, Adobe RGB works. For broad-gamut monitors, Adobe RGB will work better than sRGB. In addition, Adobe RGB will be a better option if you work on non-color-managed applications.
When printing photos on a wide-gamut monitor, using Adobe RGB is the best option. This way, you can check that the print and image displayed on the screen are the same.
Which Color Space is Considered to be Ideal for Photography?
When you are linked to photography in one way or another, you should be aware of different color spaces. The main reason for having awareness about color spaces is when you convert the image from one color space to another, and you can lose some of its colors if you lack knowledge.
But choosing an appropriate color space for your photos is difficult, right? We will help you by comparing sRGB, ProPhoto RGB, and Adobe RGB. You must have noticed that when you are scrolling through a shopping site, the product photos look eye-catching, but when you get the product, there is a vast difference.
That's all because of color saturation. Because of this, photographers should use ProPhoto RGB to get more accurate images. Almost every software and tool have color space options. So you can convert sRGB into ProPhoto RGB or Adobe RGB. But, to show off your photography skills and better results, do use ProPhoto RGB.
Different Processes that Images Go Through
These pre-and post-processes that images go through are only to check the quality and ensure that images are authentic. Here are a few tips and tricks to get high-quality results.
Monitor Calibration
First, check if your monitor is calibrated or not or else, there is the possibility that the image results will vary in print and on screens. Next, get calibration software and a spectrometer to check your monitor tints are working smoothly.
Select the best background
In product photography, background matters. Not going into so much fuss, transparent or white background enhances the quality of the product and increases the focus. Make sure to remove the background before processing the images.
Fortunately, various online tools can help you eliminate unwanted backgrounds in an image or even replace them with another background. The most popular tool is Erase.bg. Below, we will learn what it is and how it works to deliver stunning pictures with appealing backgrounds.
Image Enhancement
Image enhancement highlights certain interesting features in an image, like changing the brightness, contrast, etc.
Use Color Grading
Colour grading changes the vibe of the photos and ambiance. In software such as Photoshop or Lightroom, you can do color grading.
Using Erase.bg - An AI-based Online Image Background Removal Tool
Editing images can be much easier if you choose the right tool to do the task, including counting on a free tool to remove the background from images without hurting its original details. Taking the background off an image allows you to experiment with visual factors.
For example, you can create compelling website banner images or creative social media pictures for your marketing campaign. Using Erase.bg is a great idea if you are not into graphics or do not know of any coding or Photoshop skills.
The tool lets you remove the background within seconds without any complex or technical steps. Keep reading to know more about it. Erase.bg is an AI-based application that automates editing and delivers quality results.
Upload an image with a background you want to remove or replace and wait for 2 to 3 seconds. Then, the AI algorithms of the image automatically detect the areas to remove & provide you with a transparent background image.
You can also edit it later to get your preferred background. It is a free, easy, faster & lightweight AI-based tool you can download from the Play store/App store. It also supports batch processing in its subscription-based plan. Here is how it works:
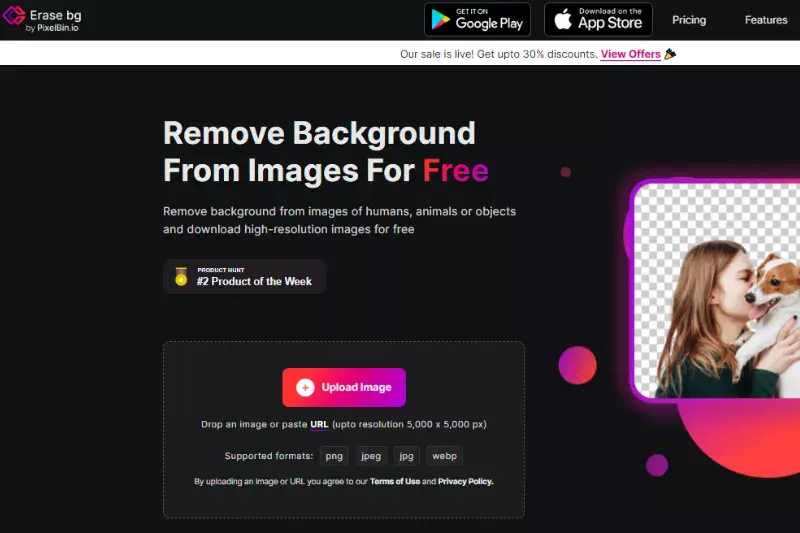
Step 1 - Download the Erase.bg app for your android/ios devices. You can also access its official website by typing “Erase.bg” in the web browser.

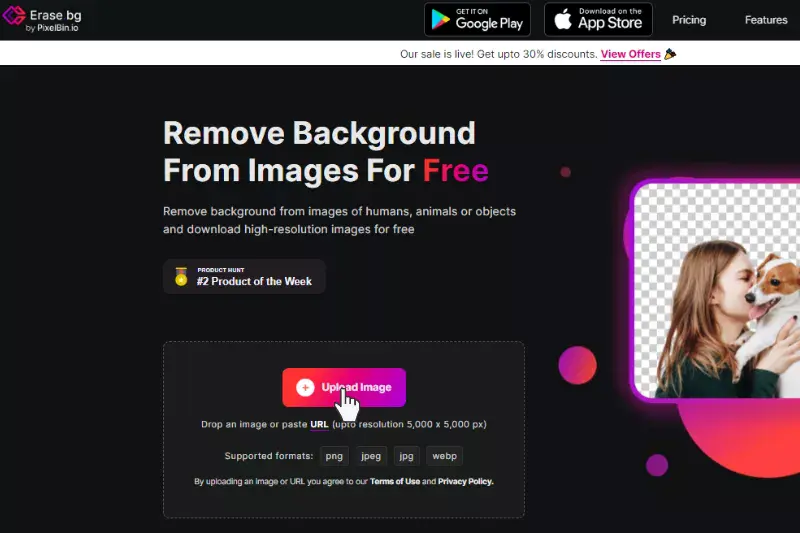
Step 2 - Click the “+ Upload image” button on the website. It lets you select the image from your gallery, or you can drag & drop the image that you want to remove/replace the background. As an alternate, you can also paste the image address. Finally, click on the “URL” button.

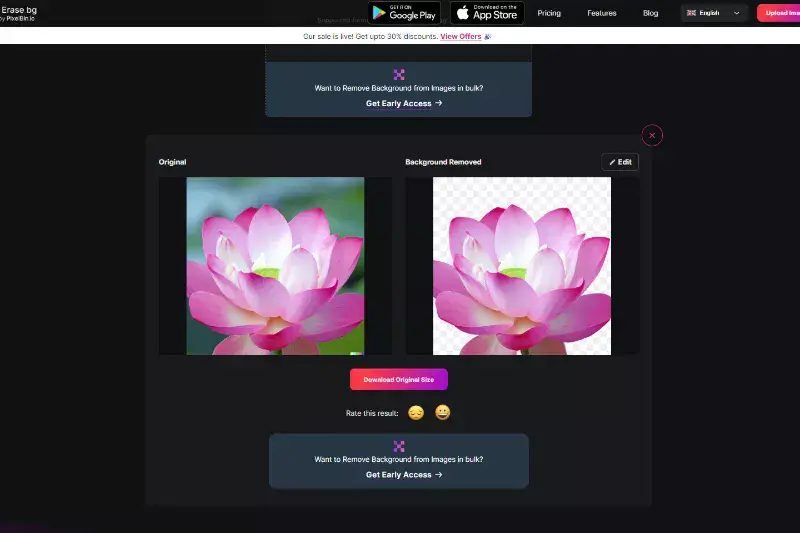
Step 3 - Submit” the image. The Ai algorithms will start processing the image. You can see a message on your screens that says, “Processing Image, please wait.” Within 2 to 3 seconds, the background will be removed.

Step 4 - The most favorable part of using the Erase.bg is that you aren’t required to do manual edits like area selection or brushing tools to remove remaining imperfections. AI algorithms automatically detect the areas and remove them. It makes the process faster and saves you valuable time. You get quality & faster results.

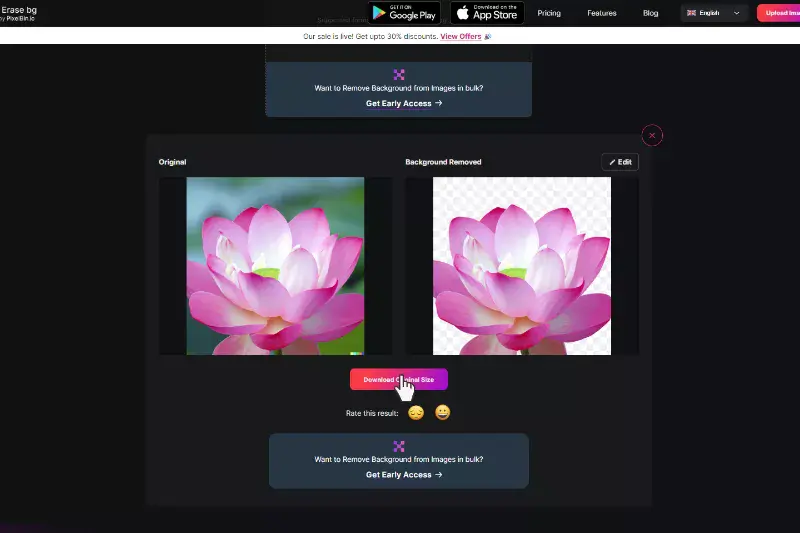
Step 5 - When the processing is over, you can simply download the image by pressing the “Download Image” button or can replace the transparent background with white or any other background using the “Edit” button. The app has its in-built library with several background options that you can choose from. Apply one, and then you can download the image.

You don’t have to worry about the quality of your images. The app retains all the image details, ranging from colors, pixels & tones to edges and brightness.
Reasons to use Erase.bg
Take a look at the amazing features that you will get using Erase.bg:
- The app is available for both android & iOS devices.
- You can download it for free.
- Anyone can use it without any technical editing knowledge.
- It is easy, faster, and lightweight, occupying less space on your device.
- No need to sign-up to use online.
- It provides 45 images per month in the free version.
- It supports images up to the resolutions of 5,000 x 5,000 pixels and 25 MB in various formats, including PNG, JPG, JPEG, WEBP, etc.
- It is a recommended app for social media graphics, e-signatures, company logos, and presentations.
- Based on AI algorithms that automate the whole task.
- No manual editing requirement etc.
Conclusion
Now you know that color spaces are different color modes people use in an image-editing program. RGB is the most widely used color space where each image comprises three different images - Red, Blue, and Green. The reason we want color spaces is that it helps in representing pixel values using tuples.
FAQ's
What are the different color spaces?
The most commonly used color spaces are sRGB, Adobe RGB, and ProPhoto RGB. sRGB is a color space developed by Microsoft and HP for digital use. It is the most suitable color space for computer screens and other devices like tablets and smartphones.
Which is better, Adobe RGB or ProPhoto RGB?
The Adobe RGB gamut is larger, especially in the green and cyan colors, enabling more color saturation. ProPhoto RGB is the largest of the three, including “colors” outside that we can see.
How can I remove backgrounds from images for free?
Erase.bg is an online free image background removal tool that works on Ai and removes background within seconds. It is available for both android/iOS devices.
Can I get the white background for my images using Erase.bg?
All you need to do is to upload the image on Erase.bg, and Ai will make the background transparent. Then, go to the “edit” button and select a white background. Then, apply it and download the image.
Should I use ProPhoto RGB or Adobe RGB?
Whether to use ProPhoto RGB or Adobe RGB depends on your specific needs and the intended use of your images. ProPhoto RGB has a wider color gamut than Adobe RGB, but it may not be supported by all devices and software. Adobe RGB is more widely used and may be a safer choice for compatibility, but it has a narrower color gamut. Ultimately, the choice between the two depends on your workflow and the intended use of your images.
What is the difference between sRGB, ProPhoto RGB, and Adobe RGB?
sRGB, ProPhoto RGB, and Adobe RGB are different color spaces used in digital photography and image editing. sRGB is a standard color space that is widely supported by devices and software. ProPhoto RGB has a wider gamut than sRGB, which means it can display a broader range of colors. Adobe RGB is also wider than sRGB but narrower than ProPhoto RGB. The choice between these color spaces depends on your needs, workflow, and intended use of your images.