


5 Tips and Tricks to more Optimize Photoshop Workflow


The photo editing market has many software tools to assist designers and photographers with editing, retouching, image composition, and effect addition. One of the most widely used photo editing programs is Photoshop.
This allows you to do all of your editings in one place. It may take many hours of effort to become proficient with Photoshop because it has a lot of hidden tools. So, here are a few tried-and-true workflow strategies to improve your productivity and accelerate your photo editing abilities.
Photoshop Workflow Strategies

Luckily, there is a large variety of Photoshop tutorials online to allow you to learn more about the software. It can be difficult to know where to start, although Adobe's own tutorials are a good option, and you find some of those below. Photoshop tutorials are best for beginners, intermediates, and commanders.
These tutorials will help to optimise Photoshop workflow. These tutorials will also teach you things varying from the basic skills and knowledge you need to get started editing photos, designing logos, and creating docs to bigger tools that can be used to design comic art like a Marvel pro or to paint incredible portraits.
Different Portions:
The beginners' portion focuses on Photoshop tutorials that inaugurate key tools and crucial skills. The intermediate tutorials aim to elaborate that knowledge with more features, while the modern tutorials incorporate tips on illustration, master grids, and how to alter photos like a pro.
How to Optimize Photoshop Workflow?
There are various methods of optimising Photoshop workflow. Let’s see some of these methods:
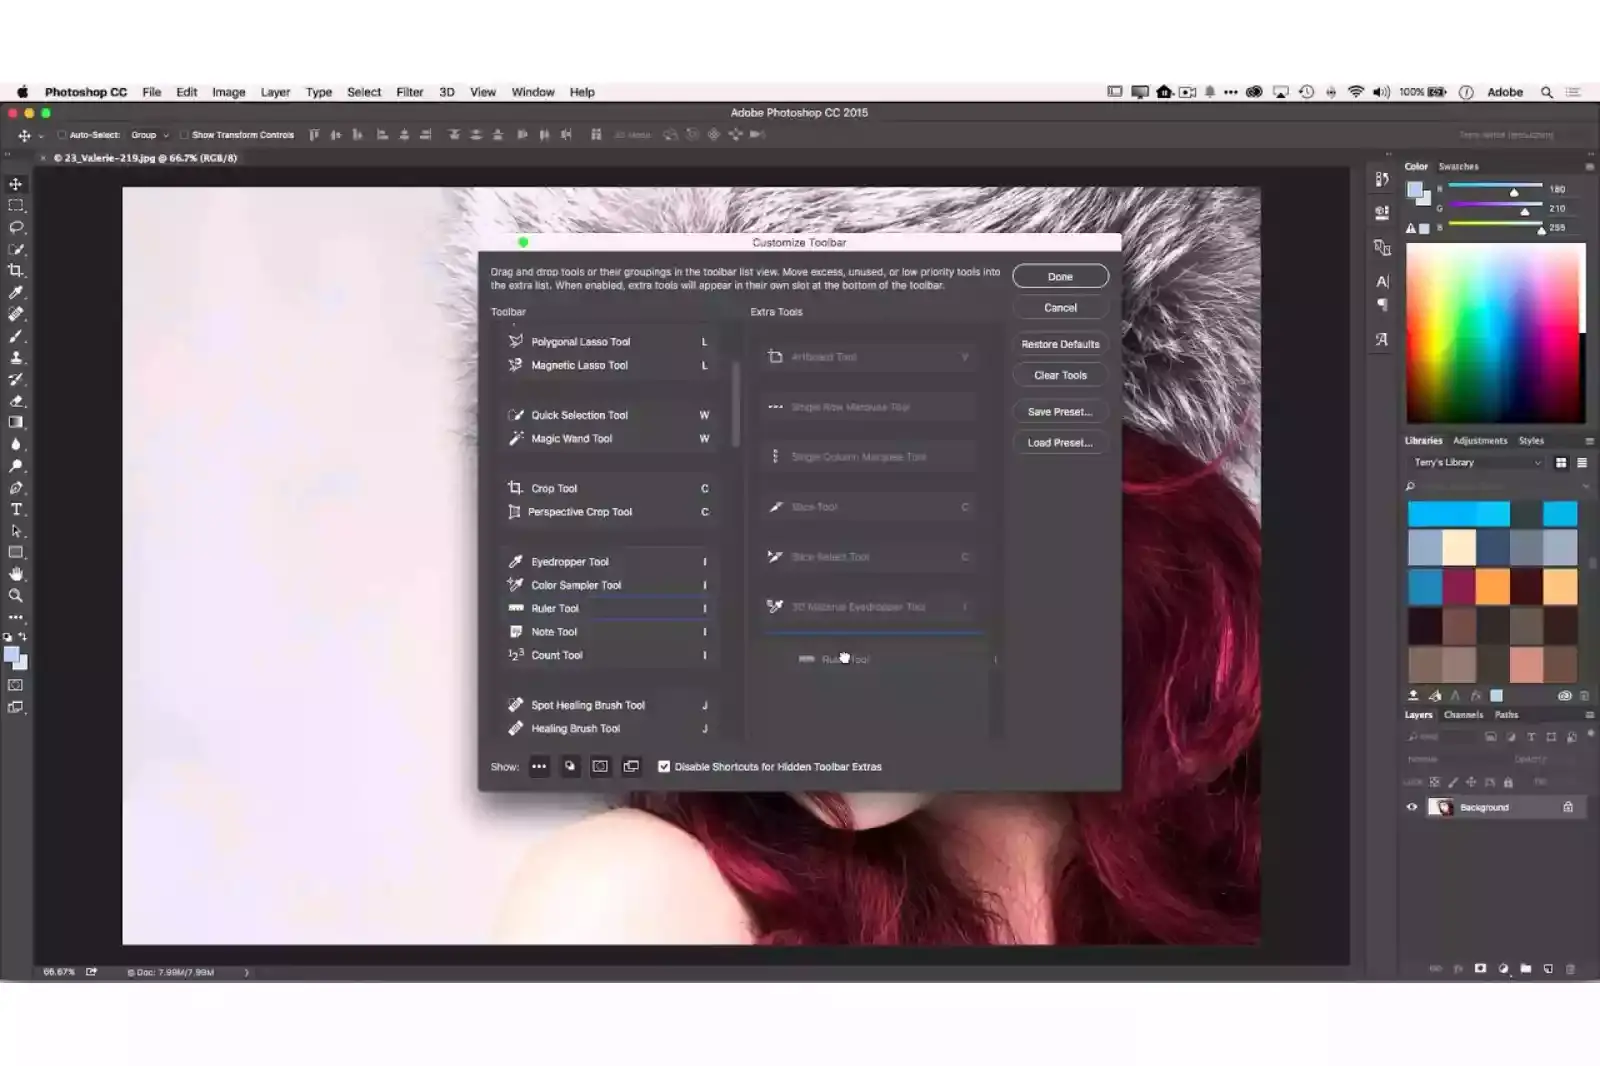
Cleaning up Trashy Toolbar:
The first thing you need to do is to clean up your trashy toolbar. There are many tools you have never used and will never use in your lifetime, so why do you keep them? So, why do you keep them?
Are the tools like the single-row marquee or the artboard tool ever going to use them? I think you shouldn't use them, and if you never use these tools anymore, just clean them up. It makes your toolbar look smaller and cleaner and makes it run faster.
That's weird but true, so go to the edit toolbar and drag and drop each tool you know you'll ever use, like the artboard tool and the single room marquee tools. For me, the magnetic lasso tool, the slice select tool, the frame tool, the 3d material eyedropper tool, the colour sampler tool, the note 2, the ruler tool, the count tool.
The content-aware move tool, the red eye tool, the pencil tool, the colour replacement tool, the pattern stamp tool, the art brush tool, the history brush tool, the magic eraser tool, the background eraser tool, the 3d material drop tool, and all these trash tools have been sitting in your toolbar, and you never took care of it.
Organise and Name Toolbars:
After you have cleaned up your toolbar successfully, it's time to start moving these panels around and putting them in the best order so that we have the space available for our creative process. I’m going to show you how?
So, go to window workspace, create a new one, and give it an n sure to include the keyboard, shortcuts, menus and toolbar. Now it's time to move these panels around and order them correctly.
If you can't move them, make sure you have not locked the workspace unintentionally, and this is what I have found to be the best arrangement of the panels in Photoshop.
Rearrange Toolbars or Panels:
Take out all your panels and move them to the centre and let's rearrange them all together. Just like that, take your toolbar out and take your colour panel out and take your layers panel out, and also all your adjustments or any extra panels that you have.
One thing that bugged the hell out the most was why we have the layers panel and the channels panel and the paths, the colours, the swatches, the properties, the adjustment, pretty much all the windows, and stuff on the right side, and we have the toolbar on the left like for God's day Photoshop.
Why shouldn't we have them all in the same place so we don't have to keep moving to the left and right all the time and we can have a more organised interface? So the first thing to do is firstly move the toolbar to the right side of the screen.
Then you can move your collar panel over there if you don't use swatches. Close them. If you don't use any of these other extra panels, just close them. Here is the thing that you do not understand the people that still use this puddle of colours.
Accuracy
It's not accurate. Just click on the three lines and choose another thing like him or the colour wheel that is a lot more accurate than just a square of colours, and people are always explaining why you can't change the proper colour for your pieces. First, get your colour panel to look correct with this HSV colour panel.
You're going to see the percentages of hue saturation and brightness, and in my opinion, it is a lot more accurate, so you can use both versions of it. There's a version with the colour wheel, and there's a version without the colour wheel.
Which takes a little less space if you want more space, but just get rid of the default colour puddle and use this one and then move your layers panel if you do not use any of these tabs feel free to get rid of it. For example, I do not use pads that much, so I will close them.
Leaving Toolbar
I will keep the layers and the channels, and I will put them over here and extend them from the bottom, so I have more layers panel, and again, just don't let it snap to anything. Leave your toolbar. The colour panel and the layers panel float in the air.
Don't let it snap because it will eventually take up more space. You might not notice it, but it will; I have measured it, and it is proven that it takes a little more space. It might not be much, but we optimise this interface for the best performance.
Batch Resize Images:

You batch resize many of your images by running them through a script which sounds much more difficult than it is. What you have to do for a batch resize is simply go to file, then go to scripts, and then go to the image processor, and you can apply the settings to the image you have opened or to an entire folder.
You can also select where to save this image on your computer or laptop. When you have done this, select the type of image you want to keep. In the last, you can choose your image size by clicking on resize to fit by the width and the height of the image and then select run.
Learning Photoshop Bypass:
Because of how immense Photoshop is, the amount of information, hints, and suggestions may seem massive. There are so many things to know that we believe that knowledge that saves our time will cause stress on the brain. As a result, we frequently look the shortcuts.
Your Photoshop process will be more efficient and perform better if you learn all the shortcuts. You will become more productive and creative by using these workflow strategies.
They might require some initial time and effort to understand, but after some time, they will become useful for everyone who enjoys experimenting with Photoshop.
With Action Commands, You Won’t Have to Repeat Actions:
Many images need editing in the same way. This editing can be very boring. Photoshop created a solution called an action command to save you from the boredom of doing the same editing and saves you valuable time. Actions can be performed on any file, whether a single file or a group of files, including menu options, panel options, tool options, etc.
A photographer, for example, can have actions for retouching jobs, and designers can have many design options. Action Commands keep the workspace clean and uncluttered, allowing tasks to be completed quickly and accurately.
FAQ's
What are the key steps to optimise my Photoshop workflow?
Optimizing your Photoshop workflow involves: 1. Organizing and structuring your files with proper naming conventions and folder hierarchy. 2. Utilising non-destructive editing techniques, such as using adjustment layers and smart objects. 3. Customise Photoshop's interface, workspace, and keyboard shortcuts to match your preferences. 4. Leveraging automation tools, like actions and batch processing, to save time. 5. Properly managing system resources and Photoshop settings for optimal performance. 6. To enhance efficiency, continuously learn and adapt to new features, techniques, and shortcuts.
How can I use adjustment layers and smart objects to improve my workflow in Photoshop?
Adjustment layers and smart objects allow for non-destructive editing. Adjustment layers enable you to apply edits to a layer without permanently altering its content. At the same time, smart objects allow you to resize, transform, and apply filters without losing quality or making permanent changes. These techniques help you preserve your original image and make it easy to undo or modify edits as needed, improving your workflow efficiency.
How can I customise Photoshop's interface and workspace to suit my needs better?
You can optimise your workspace by rearranging panels, creating custom panel groups, and choosing which tools are displayed on the toolbar. Additionally, you can save multiple workspaces tailored to specific tasks or workflows. To customise keyboard shortcuts, go to Edit > Keyboard Shortcuts, and modify them to match your preferences, speeding up your workflow by reducing reliance on menus.
What are Photoshop actions, and how can they help streamline my workflow?
Actions are recorded tasks or commands you can save and replay on other images. They allow you to automate repetitive tasks, such as resizing, applying filters, or adjusting levels. Creating and using actions can save time and maintain consistency across your projects.
How can I ensure Photoshop runs smoothly and efficiently on my computer?
To optimise Photoshop's performance, consider: 1. Adjusting Photoshop's performance preferences, such as memory usage and cache settings. 2. Keeping your computer's operating system, drivers, and Photoshop itself up-to-date. 3. Closing unnecessary programs and processes while working in Photoshop. 4. Ensuring your hardware, especially your RAM and graphics card, meets or exceeds the recommended system requirements.
Are there any plugins or third-party tools that can enhance my Photoshop workflow?
Numerous plugins and extensions can improve your Photoshop experience by adding new features or simplifying existing tasks. Some popular choices include GuideGuide for creating and managing guides. Font Awesome for incorporating vector icons, and ON1 Resize for high-quality image resizing. Always ensure that any third-party tools are compatible with your version of Photoshop before installation.
.webp)

.webp)

.webp)

.webp)
.webp)


