


Top 8 Ways To Help Remove Background in Illustrator


Do you need help to remove the background in Illustrator for your design projects? Whether working on Illustrator CC or using another version, background removal can be a game-changer for your creative work. Imagine the ease of isolating your main subject, creating stunning visuals without the distraction of unwanted backgrounds.
This blog will guide you through making removing background images in Illustrator simple and efficient, saving you time and enhancing the quality of your designs. With the right tools and techniques, you no longer need to wrestle with complex software or spend hours meticulously erasing backgrounds. You can seamlessly integrate background removal into your workflow, allowing you to remove background images in Illustrator CC effortlessly.
Say goodbye to the tedious manual process and hello to quick, accurate background removal that elevates your creative projects. Join us as we explore the best practices and tips for removing backgrounds in Illustrator. Discover how to simplify your design process, providing crisp, clean images that stand out. Transform your design game today and experience the future of background removal.
What is Adobe Illustrator CC, and What is it For?
Adobe Illustrator CC is a powerful vector graphics editor developed by Adobe Inc., widely used by designers, artists, and illustrators worldwide. The "CC" stands for Creative Cloud, which means this software is part of Adobe's subscription-based suite of creative tools. Here’s a closer look at what Adobe Illustrator CC is and what it’s used for:
What is Adobe Illustrator CC?
Adobe Illustrator CC is a professional graphic design application specializing in creating vector graphics. Unlike raster images, which are made up of pixels, vector graphics are composed of paths defined by mathematical equations. This allows infinite scalability without losing quality, making Illustrator an ideal tool for creating everything from small icons to large-scale artworks.
What is it For?
Logo Design:
Illustrator is extensively used for designing logos. The vector format ensures that logos can be scaled to any size without losing clarity or detail, which is essential for maintaining brand consistency across different media.
Illustrations:
Artists and illustrators use Illustrator to create detailed, intricate artwork. The software offers a variety of tools for drawing, coloring, and adding effects to create high-quality illustrations for books, magazines, and digital media.
Typography:
Illustrator provides advanced typography tools that allow designers to manipulate text creatively. This includes custom lettering, text on a path, and the ability to convert text into vector shapes for further customization.
Infographics:
With its powerful graph and chart tools, Illustrator is ideal for creating infographics. Designers can visualize data clearly and engagingly, making complex information more accessible and understandable.
Web Design:
Although not a web design tool per se, Illustrator is used to create web graphics, UI elements, and wireframes. Its precision and vector capabilities make it a favorite among web designers for creating scalable assets.
Print Media:
From brochures and flyers to posters and business cards, Illustrator is widely used in the print industry. Its robust set of tools ensures that designs are print-ready, maintaining high resolution and color accuracy.
Product Packaging:
Illustrator is also used for designing product packaging. Its ability to handle complex shapes and precise measurements makes it suitable for creating detailed packaging designs that stand out on shelves.
How To Remove Background From An Image in Adobe Illustrator CC
Removing the background from an image in Adobe Illustrator CC can significantly enhance your design work, allowing you to isolate subjects and create cleaner, more professional visuals.
Whether designing a logo, creating a marketing graphic, or preparing an illustration, knowing how to remove backgrounds is a valuable skill. This guide will walk you through the process step-by-step, ensuring you can easily remove the background in Adobe Illustrator.
By the end of this tutorial, you'll be able to transform your images with precision and efficiency, taking full advantage of Illustrator's powerful tools. Let's dive in and simplify background removal in Adobe Illustrator CC!
Step 1: Open Your Image: Start by opening Adobe Illustrator CC and importing the image from which you want to remove the background. Ensure your image is in a compatible format, such as JPEG or PNG.
Step 2:Select the Background: Use the Selection Tool (V) to click on the background of your image. This selects the entire area you want to remove.
Step 3: Apply the Clipping Mask: Go to the "Object" menu, choose "Clipping Mask," and then "Make." This action will mask the selected background, leaving only your subject visible.
Step 4:Refine (Optional): To refine the edges or make further adjustments, use the "Direct Selection Tool" (A) to modify the clipping path. You can also use other tools like the Pen Tool (P) or the Eraser Tool to clean up any remaining areas.
Remove the Background in Illustrator Using Image Trace
Removing backgrounds in Adobe Illustrator using Image Trace can streamline your workflow, quickly and effectively isolating subjects from their backgrounds. Image Trace is a powerful feature that converts raster images into editable vector artwork, making it ideal for removing backgrounds while preserving image quality.
This tutorial will guide you through the process step-by-step, showing you how to leverage Illustrator’s Image Trace to achieve clean, professional results. Whether you're a graphic designer, illustrator, or hobbyist, mastering this technique will empower you to create stunning visuals easily.
Learn how to remove backgrounds effortlessly and enhance your design projects using Adobe Illustrator’s versatile Image Trace feature. Let's get started and unlock the potential of background removal in Illustrator!
Step 1: Import Your Image: Start by opening Adobe Illustrator and importing the image from which you want to remove the background. Ensure your image is in a suitable format, such as JPEG or PNG.
Step 2:Select the Image: Click on the image to select it. This activates the Image Trace option in Illustrator.
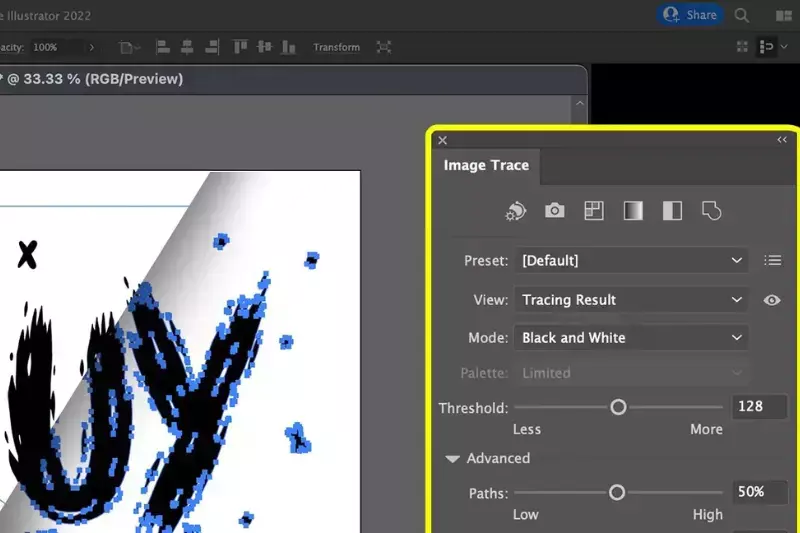
Step 3:Apply Image Trace: Go to the "Window" menu and select "Image Trace" to open the Image Trace panel. Adjust the settings in the panel to refine the tracing result. You can choose presets like "High Fidelity Photo" or customize settings for better accuracy.
Step 4:Expand and Edit: Once satisfied with the preview, click the "Expand" button in the Control or Image Trace panels. This converts the traced image into editable vector artwork. Use the Direct Selection Tool (A) to select and delete the background vector paths as needed.
Remove the Background in Illustrator Using the Pen Tool
Removing backgrounds in Adobe Illustrator using the Pen Tool offers a precise and flexible approach to editing images. Whether you're a graphic designer, illustrator, or enthusiast, mastering this technique empowers you to create polished visuals easily. The Pen Tool allows for meticulous selection and editing of paths, making it ideal for isolating subjects from their backgrounds.
This tutorial will guide you through the process step-by-step, demonstrating how to remove backgrounds and refine your artwork effectively. By learning how to utilize the Pen Tool in Illustrator for background removal, you gain valuable skills that enhance your creative workflow.
Join us as we explore this essential technique and elevate your design capabilities with Adobe Illustrator's versatile tools. Let's dive in and discover the art of background removal using the Pen Tool!
Step 1:Open Your Image: Start by opening Adobe Illustrator and importing the image from which you want to remove the background. Ensure your image is in a compatible format, such as JPEG or PNG.
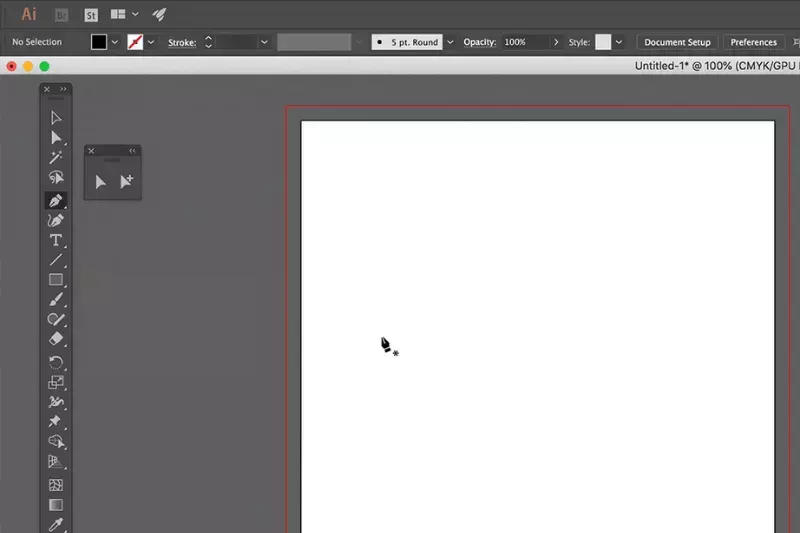
Step 2:Select the Pen Tool: In the toolbar, select the Pen Tool (P) or press 'P' on your keyboard to activate it.
Step 3:Outline the Background: Use the Pen Tool to carefully trace around the areas of the image you want to remove. Create a closed path around the background you wish to delete.
Step 4: Make a Selection: After completing the path, right-click inside the path and choose "Make Selection" from the context menu. Adjust the feather radius if needed, then click OK.
Step 5:Delete the Background: Press the Delete key on your keyboard to remove the selected background area. You should now have your subject isolated on a transparent background.
Remove the Background in Illustrator Using Magic Wand
Removing backgrounds in Adobe Illustrator using the Magic Wand tool provides a straightforward and efficient method to edit images. Whether you're a seasoned designer or new to Illustrator, mastering this technique allows you to isolate subjects from their backgrounds with precision quickly.
The Magic Wand tool in Illustrator enables you to select areas of similar color and tone, making it ideal for removing backgrounds in raster images. This tutorial will guide you through the process step-by-step, demonstrating how to leverage the Magic Wand tool effectively for background removal.
Learning this technique will streamline your workflow and enhance your ability to create clean and professional visuals. Join us as we explore how to remove backgrounds effortlessly using Adobe Illustrator's versatile Magic Wand tool. Let's dive in and unlock the potential of background removal in Illustrator!
Step 1:Open Your Image: Start by opening Adobe Illustrator and importing the image from which you want to remove the background. Ensure your image is in a compatible format, such as JPEG or PNG.
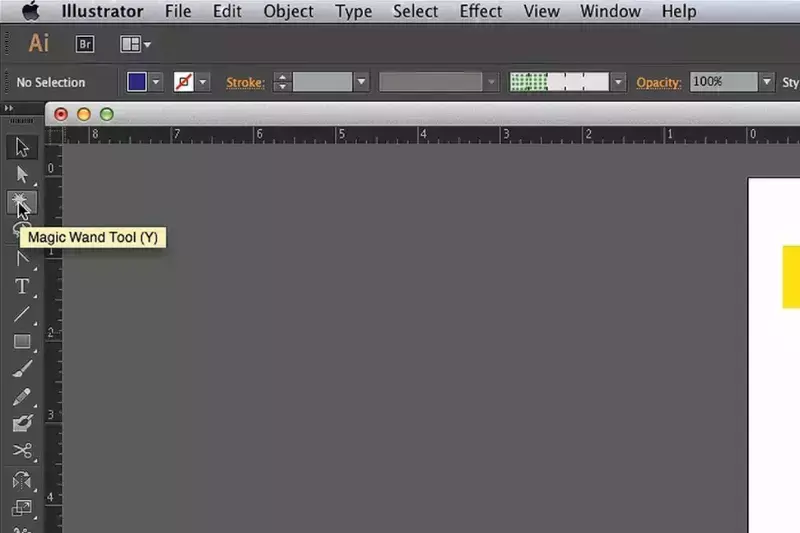
Step 2:Select the Magic Wand Tool: In the toolbar, locate and select the Magic Wand Tool (Y) or press 'Y' on your keyboard to activate it.
Step 3:Adjust Tool Settings: Adjust the tolerance level in the Magic Wand Tool options at the top of the screen. A lower tolerance selects fewer colors, while a higher one selects more.
Step 4:Select the Background: Click on the background area of your image with the Magic Wand Tool. Illustrator will select all areas of a similar color and tone based on the tolerance level you set.
Step 5:Delete or Mask the Background: With the background selected, press the Delete key on your keyboard to remove it. Alternatively, you can create a mask by clicking the "Add Layer Mask" button in the Layers panel.
Step 6:Refine (Optional): Use the Direct Selection Tool (A) or the Pen Tool (P) to refine the selection or make any necessary adjustments to the mask.
How To Get Rid of A White Background in Illustrator EPS
Removing a white background in an Illustrator EPS file is crucial for creating clean, professional graphics. Whether you're preparing artwork for print, web, or digital media, removing the background enhances your designs' visual appeal and versatility.
Adobe Illustrator offers powerful tools to achieve this, ensuring your EPS files maintain transparency where needed. This tutorial will guide you through the process step-by-step, providing you with the skills to remove white backgrounds from EPS files efficiently.
By mastering this technique, you'll be able to create transparent backgrounds that seamlessly integrate into various design projects. Join us as we explore how to eliminate white backgrounds in Illustrator EPS files and elevate your design capabilities with precision and clarity.
Step 1:Open Your EPS File: Start by opening Adobe Illustrator and importing your EPS file. Ensure your file is in a suitable format and ready for editing.
Step 2:Unlock the Background Layer: If the EPS file has a locked background layer, unlock it by selecting the layer and clicking the lock icon in the Layers panel.
Step 3:Select the White Background: Use the Selection Tool (V) to click on the white background. This selects the entire area you want to remove.
Step 4:Delete the Background: Press the Delete key on your keyboard to remove the selected white background. The background should now be transparent, represented by a checkerboard pattern in Illustrator.
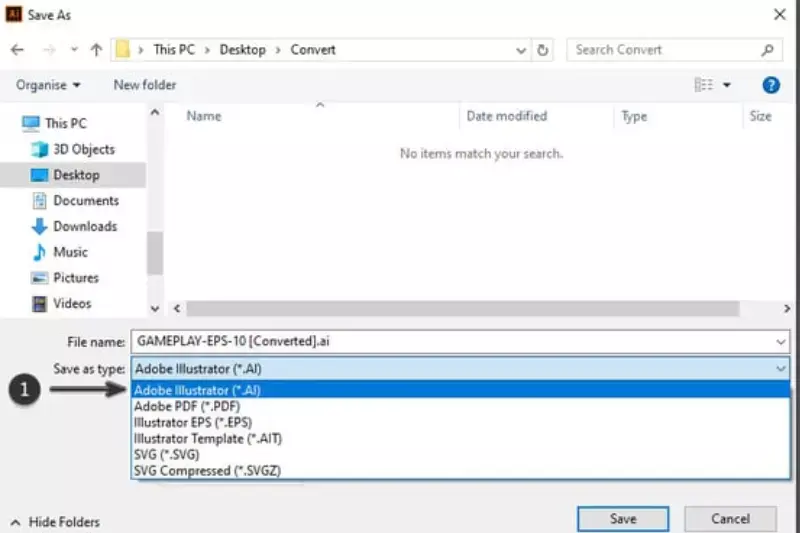
Step 5:Save Your File: Once you've removed the white background, save your EPS file to preserve transparency. Choose the appropriate settings and format to maintain quality and compatibility for your intended use.
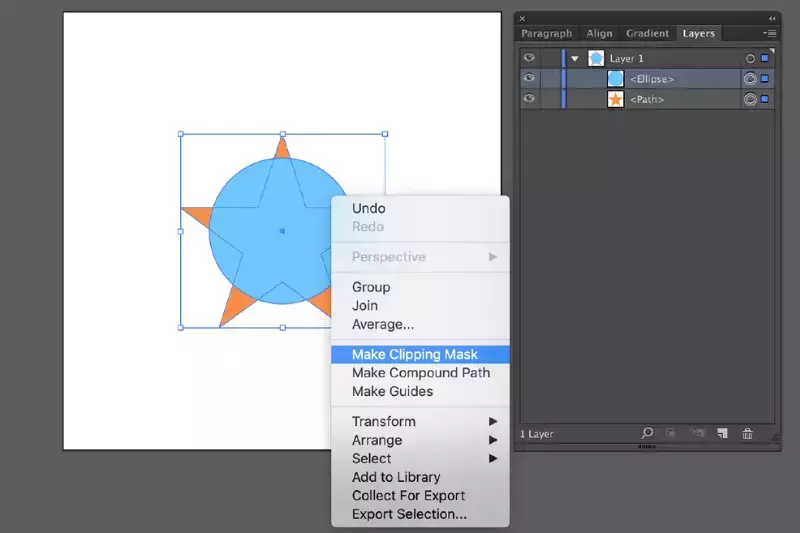
How to Remove Background in Illustrator Using Clipping Masks
Removing backgrounds in Adobe Illustrator using clipping masks offers a precise and versatile method for editing images and illustrations. Whether you're a graphic designer, illustrator, or hobbyist, mastering this technique allows you to isolate subjects from their backgrounds quickly.
Clipping masks in Illustrator provides a non-destructive way to hide unwanted parts of an image while preserving the original artwork. This tutorial will guide you through the process step-by-step, demonstrating how to leverage clipping masks effectively for background removal.
By learning this essential technique, you'll gain valuable skills to enhance your design projects, from creating clean compositions to preparing artwork for various applications. Join us as we explore how to remove backgrounds seamlessly using Adobe Illustrator's powerful clipping mask feature. Let's dive in and unlock the potential of background removal in Illustrator!
Step 1:Open Your Image: Start by opening Adobe Illustrator and importing the image from which you want to remove the background. Ensure your image is in a compatible format, such as JPEG or PNG.
Step 2 Create a Shape: Use the Rectangle Tool (M) or any other shape tool to draw a shape that covers the area you want to keep. This shape will act as your clipping path.
Step 3:Arrange Layers: Position the shape above your image layer in the Layers panel. Ensure the shape completely covers the area you want to retain.
Step 4:Select All: Select the shape and the image layer by clicking on them while holding down the Shift key.
Step 5: Apply Clipping Mask: With both layers selected, go to the "Object" menu, hover over "Clipping Mask," and choose "Make" (or use the shortcut Cmd/Ctrl + 7). This will clip the image to the shape of the selected object above it.
Step 6:Refine (Optional): Use the Direct Selection Tool (A) to adjust the shape or image position within the clipping mask if needed.
Step 7:Save Your File: Save your file once satisfied with the result. Illustrator will preserve the transparency where the background was removed, allowing you to use the image in various contexts seamlessly.
Simple Way to Remove the Background in Adobe Illustrator
Removing backgrounds in Adobe Illustrator can significantly enhance your design workflow by providing a seamless way to isolate subjects and create clean, professional graphics. Whether you're a designer, illustrator, or hobbyist, mastering this technique empowers you to produce polished visuals quickly.
Adobe Illustrator offers several methods to remove backgrounds, each catering to different needs and preferences. This tutorial focuses on a straightforward approach to achieving transparent backgrounds using Illustrator's tools effectively.
Learning this essential skill will expand your creative capabilities and refine your designs for various applications. Join us as we explore a simple yet effective way to remove backgrounds in Adobe Illustrator, ensuring your images are ready to integrate seamlessly into any project or presentation.
Step 1:Open Your Image: Start by opening Adobe Illustrator and importing the image from which you want to remove the background. Ensure your image is in a compatible format, such as JPEG or PNG.
Step 2:Select the Background: Use the Selection Tool (V) to click on the background area you want to remove. Make sure you select the entire background you wish to delete.
Step 3:Delete the Background: Press the Delete key on your keyboard to remove the selected background area. Illustrator will automatically create a transparency where the background was deleted, represented by a checkerboard pattern.
Step 4:Save Your File: Once you've removed the background, save your file in a suitable format such as AI, PDF, or SVG. Choose the appropriate settings to preserve transparency and maintain quality for your intended use.
How to Remove Background in this Software Using Selective Features
Removing backgrounds in Adobe Illustrator using selective features allows for precise editing and customization of images. Illustrator provides powerful tools that cater to different needs, from simple to complex background removal tasks.
Whether you're editing photographs, illustrations, or graphics, mastering these selective features empowers you to achieve professional results efficiently. This approach enhances the visual appeal of your designs and streamlines your workflow by offering tailored solutions for each project.
Join us as we explore how to utilize Illustrator's selective features for background removal, ensuring your images maintain clarity and quality while seamlessly integrating into various design contexts.
Step 1:Select the Desired Tool: Choose the appropriate tool depending on the background's complexity and the image. The Magic Wand Tool (Y) can be effective for simple backgrounds. Consider using the Pen Tool (P) or the Lasso Tool (Q) for more complex backgrounds or irregular shapes.
Step 2:Refine the Selection: Use the selected tool to carefully outline and select the background area you want to remove. Adjust tool settings such as tolerance (for Magic Wand) or precision (for Pen Tool) to ensure accurate selection.
Step 3:Delete or Mask the Background: Once the background is selected, press the Delete key to remove it or use a Clipping Mask (Object > Clipping Mask > Make) to hide it. A Clipping Mask allows you to retain the original image while concealing the selected background.
Step 4:Review and Adjust: After removing the background, review the image for any imperfections or areas that need refinement. Use the Direct Selection Tool (A) or the Pen Tool (P) to make adjustments as necessary.
Conclusion
Adobe Illustrator offers powerful tools like the Magic Wand, Pen Tool, and Clipping Masks for removing backgrounds with precision and flexibility. By mastering these techniques, designers can achieve clean, professional results, enhancing their artwork's versatility and suitability for a wide range of creative applications.
FAQ's
Why is my PNG image a black background?
The default background is black, so your transparency will look black until anything behind it or you change the background. PNG is absolutely transparent.
How do I remove the black background from a PNG?
When a PNG image with a transparent background is recently selected from the file selector and appears with a black background, the black background is uploaded to the image, and every time a new file again, The image is made by uploading, you use the image.
How do I make a layer transparent in Illustrator?
The attendance panel is found in the attendance panel within the property panel. Click on the arrow to the right of the 100% optimal indicator.
How do I change the background of a picture in Illustrator?
If you have a pixel-based (Rekhapunj) image in Illustrator, you can use a clipping mask to remove the background from the image.
Why can't I erase a part of an image in Illustrator?
You only have the option to open the original file in Illustrator and apply the eraser tool in that document.
How do I make my background transparent?
To make the background of an image transparent using Erase.bg, follow these simple steps: 1. Visit the Erase.bg website or download it from Google Playstore or Appstore. 2. Upload the image you want to edit. 3. Erase.bg's AI technology will automatically remove the background, leaving you with a transparent background. 4. Download the edited image by clicking on Download button.
.webp)

.webp)

.webp)

.webp)
.webp)


