


How to Create a Transparent Background using Photoshop?


In today's visually-driven digital landscape, presenting images with a seamless and captivating appeal is paramount. Whether you're an aspiring photographer, a seasoned graphic designer, or a business owner looking to enhance product visuals, mastering the art of creating transparent backgrounds in images using Photoshop is worth acquiring.
With the ever-growing demand for visually appealing content, knowing how to make backgrounds transparent with Photoshop can significantly elevate the quality and impact of your visuals. In this comprehensive guide, we'll delve into the intricacies of this essential Photoshop technique, empowering you to transform ordinary images into extraordinary works of art.
This tutorial covers everything from understanding the fundamentals of transparency to mastering the step-by-step process of creating transparent backgrounds. Whether you're a novice navigating the vast world of Photoshop or a seasoned professional seeking to refine your skills, you'll find invaluable insights and practical tips to achieve stunning results. So, let's embark on this creative journey together and unlock the full potential of your images with Photoshop's transparency tools.
How Transparent Backgrounds Can Help Your Photos?
Unlock the transformative power of transparent backgrounds and elevate your photos and designs to new heights. You can seamlessly integrate your visuals into any context with transparent backgrounds, allowing them to shine in any setting. Whether you're showcasing products, creating marketing materials, or designing graphics for digital platforms, transparent backgrounds provide unparalleled versatility and visual impact. Gone are the days of being confined by static backgrounds.
Transparent backgrounds empower you to unleash your creativity and captivate your audience with images seamlessly blending into their surroundings. Whether overlaying graphics onto different backgrounds or integrating images into complex compositions, transparent backgrounds offer endless possibilities for customization and innovation. Moreover, transparent backgrounds enhance the overall aesthetic appeal of your visuals, creating a clean and professional look that draws attention to the main subject.
By eliminating distractions and focusing solely on the essential elements of your images, transparent backgrounds allow your photos and designs to speak for themselves, captivating viewers and leaving a lasting impression. In today's fast-paced digital landscape, standing out is essential. By harnessing the power of transparent backgrounds, you can ensure that your photos and designs command attention and make a memorable impact. So, dive into the world of transparent backgrounds and discover how they can take your creative projects to the next level.
How to Make a Background Transparent using Photoshop?
In this tutorial, we'll delve into the art of making backgrounds transparent using Photoshop, demystifying the process with simple, step-by-step instructions. Discover how to make background transparent in Photoshop effortlessly, whether you're a beginner or seasoned designer.
From removing backgrounds to creating transparent images, we'll cover it all, ensuring you master this essential skill. With our guide, you'll unlock the power of Photoshop to create stunning visuals that seamlessly integrate into any project or design. So, let's dive in and learn how to make backgrounds transparent in Photoshop like a pro.
Creating a transparent background in Photoshop involves several steps and tools. Here's a step-by-step guide using various tools in Photoshop:
Step 1: Open the Image in Photoshop
Open the image you want to edit by selecting File > Open and browse to your file.
Step 2: Unlock the Background Layer
In the Layers panel, double-click the Background layer to unlock it. Rename it if necessary.
Step 3: Select the Object
Use one of the following selection tools to outline the object you want to keep:
- Quick Selection Tool: Select this tool from the toolbar, then click and drag over the object.
- Magic Wand Tool: Select this tool, then click on the background to select areas with similar colours. Adjust the tolerance as needed.
- Pen Tool: Use the Pen Tool to draw a path around the object for more precise selections. Once done, right-click and select Make Selection.
- Select Subject: This option can be found under Select > Subject and uses AI to select the main subject in the image automatically.
Step 4: Refine the Selection
- Once you have a rough selection, go to Select > Select and Mask (or Refine Edge in older versions).
- Use the tools in the Select and Mask workspace to refine the edges of your selection. Adjust the settings such as Smooth, Feather, Contrast, and Shift Edge to fine-tune the selection.
- Make sure to output to a Layer Mask.
Step 5: Add a Layer Mask
With the selection still active, click the Add Layer Mask button at the bottom of the Layers panel. This will mask out the background, leaving only your selected object.
Step 6: Remove Any Remaining Background
If there are any areas of the background left, use the Brush Tool on the layer mask to paint in black (to hide) or white (to reveal) to clean up the edges.
Step 7: Save the Image with Transparency
To preserve the transparency, save the image in a format that supports it, such as PNG.
Go to File > Export > Export As and choose PNG from the format options.
Tips:
- Zoom in to work on finer details, especially around edges.
- Use soft brushes when refining the layer mask for smoother transitions.
- Frequently toggle the visibility of the layer mask to check your progress.
Example Workflow:
- Open the image.
- Use the Quick Selection Tool to roughly select the subject.
- Refine the selection in the Select and Mask workspace.
- Apply the selection as a layer mask.
- Clean up the mask with the Brush Tool.
- Export the image as a PNG to retain the transparency.
By following these steps and utilizing the different selection tools and layer masks, you can create a transparent background for your images in Photoshop.
How to Make a White Background Transparent in Photoshop?
Making a white background transparent in Photoshop is a breeze with the right tools and techniques. In this comprehensive guide, we'll take you through the step-by-step process of transforming a white background into a transparent one.
Whether you're a seasoned Photoshop pro or a beginner, you'll learn valuable tips and tricks to achieve flawless results. From selecting the background to refining edges, we'll cover everything you need to know to make your images pop. Say goodbye to dull backgrounds and hello to stunning transparency.
Let's dive in and unlock the power of Photoshop for transparent backgrounds. To make a white background transparent in Photoshop, you can use several techniques depending on the complexity and nature of the image. Here’s a step-by-step guide using a straightforward method:
Method 1: Using Layer Mask
- Open Your Image: Open your image in Photoshop.
- Select the Background: In the Layers panel, right-click on the background layer and select Layer from Background. This will convert the background into a normal layer.
- Add Layer Mask: With the layer selected, click on the Add Layer Mask button at the bottom of the Layers panel. This adds a mask to the layer next to the image thumbnail.
- Use Magic Wand Tool (Optional): If your background is solid white and relatively simple, you can use the Magic Wand Tool (shortcut key: W) to select the white area.
- Delete or Fill Selection with Mask: Once selected, press Delete to remove the white background, or alternatively, with the selection active, click on the layer mask thumbnail and fill the selection with black (shortcut key: Alt+Backspace to fill with foreground color, which should be black).
- Refine Mask (if needed): Use a soft brush on the layer mask with black color to refine the edges if necessary. Painting with white on the mask will reveal any areas accidentally hidden.
- Check the Transparency: To see the transparency, you can temporarily create a new layer below the current one and fill it with a color or place an image to check how the transparency looks.
- Save Your Image: Once you are satisfied with the result, save your image in a format that supports transparency such as PNG.
Method 2: Using Select and Mask
If the background is more complex or you need more precision:
- Use Select and Mask: Select the Quick Selection Tool (W) or Magic Wand Tool (W) to select the white background.
- Refine Edge: Go to Select > Select and Mask. Use the refine edge tools to refine your selection, especially around the edges of your subject.
- Output to Layer Mask: After refining, in the Select and Mask dialog, choose Output To: Layer Mask and click OK.
- Check and Refine: Back in the main Photoshop window, check the layer mask for any areas that need refinement. Use a soft brush with black or white to adjust the mask.
- Save Your Image: Save your image with transparency as mentioned in Method 1.
These methods should help you effectively remove a white background and make it transparent in Photoshop. Adjustments may vary depending on the specific details and complexity of your image, but these steps provide a solid foundation for achieving transparent backgrounds.
Most Popular Photoshop Features
As one of the most versatile and powerful image editing tools available, Photoshop offers a plethora of features that cater to a wide range of needs. Some of the most popular features include:
- Layers: Photoshop's layer-based editing system allows for non-destructive editing, enabling users to work on different elements of an image independently.
- Selection Tools: From the Magic Wand to the Pen Tool, Photoshop offers a variety of selection tools to isolate specific parts of an image for editing.
- Adjustment Layers: These layers allow users to apply adjustments such as brightness, contrast, and color balance without permanently altering the original image.
- Filters and Effects: Photoshop includes a vast array of filters and effects to enhance or transform images, from basic blurs and sharpening to artistic effects and distortions.
- Brushes and Painting Tools: With a wide selection of brushes and painting tools, Photoshop enables users to create digital artwork and apply realistic brush strokes to their images.
- Text Tools: Photoshop provides extensive text editing capabilities, allowing users to add and customize text with a variety of fonts, styles, and effects.
- Content-Aware Fill: This feature intelligently fills in areas of an image by analyzing its content, making it easier to remove unwanted objects or fill in gaps seamlessly.
- Smart Objects: Smart Objects are layers that preserve the original content of an image, enabling non-destructive transformations and adjustments.
- Masking and Compositing: Photoshop's masking tools allow for precise control over which parts of an image are visible, making it essential for compositing and blending multiple images.
- 3D Editing: For more advanced users, Photoshop offers 3D editing capabilities, allowing for the creation and manipulation of 3D models and textures within the software.
These are just a few of the many features that make Photoshop a favorite among photographers, designers, and digital artists worldwide. Whether you're retouching photos, creating digital artwork, or designing graphics for the web, Photoshop provides the tools you need to bring your creative vision to life.
How to Make a Background Transparent of a Logo using Photoshop?
In graphic design and branding, creating a transparent background for a logo in Photoshop is paramount for versatility and professional presentation. This guide will walk you through the essential steps of achieving this task seamlessly. Learn how to easily make the background transparent in Photoshop, ensuring your logo stands out on any backdrop.
With straightforward instructions and practical tips, mastering this skill will enhance your design prowess. Discover how to make a background transparent in Photoshop effortlessly, empowering you to craft logos seamlessly integrating into various digital and print mediums.
- Open Your Logo: Open your logo image in Photoshop.
- Select Background: Use the Magic Wand Tool (W) or Quick Selection Tool (W) to select the background around your logo.
- Add Layer Mask: With the background selected, click on the Add Layer Mask button at the bottom of the Layers panel.
- Refine Edges (if needed): Use a soft brush on the layer mask with black color to refine the edges of your logo.
- Check Transparency: You should now see your logo with a transparent background (checkered pattern).
- Save Your Logo: Save your logo as a PNG file to preserve transparency.
These steps help you quickly and effectively make the background of your logo transparent using Photoshop. Adjustments like refining edges with a brush on the layer mask ensure a clean and professional look.
How to Make a Background Transparent using Erase.bg?
Unlock the magic of Erase.bg, the ultimate tool for effortlessly creating transparent backgrounds. In this guide, we'll walk you through the simple steps to make any background transparent using Erase.bg. Whether you're a photographer, designer, or just looking to enhance your images, Erase.bg offers a hassle-free solution.
Say goodbye to tedious manual editing and hello to instant background removal. With Erase.bg, you'll achieve professional-quality results in seconds. Join us as we explore how to make a background transparent using Erase.bg and unleash your creativity like never before.
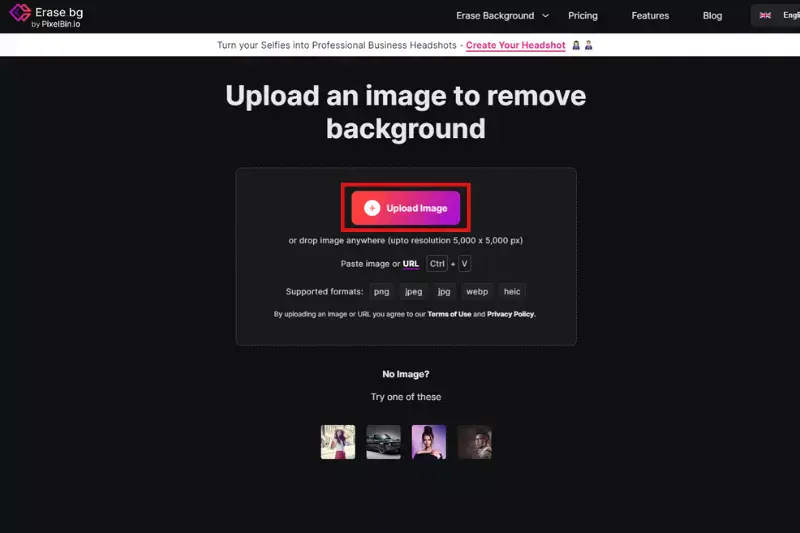
Step 1: Upload Your Image: Visit erase.bg and upload your image by clicking on "Upload Image" or dragging it onto the webpage.
Step 2: Automatic Background Removal: Erase.bg will automatically process your image to remove the background swiftly.

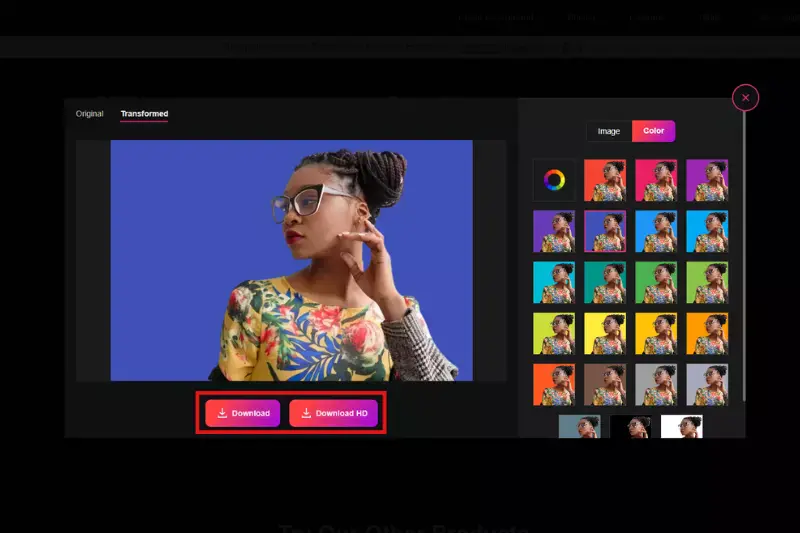
Step 3: Download Your Transparent Image: Once the background removal is complete, simply click on the "Download" button to save your image with a transparent background. The image will be saved in PNG format, which preserves transparency.
Why Choose Erase.bg for Creating Transparent Backgrounds?
Choosing Erase.bg for creating transparent backgrounds offers numerous benefits and advantages. Erase.bg is an advanced AI-based background removal tool that allows users to quickly and accurately remove backgrounds from images with just a few clicks. Here are some reasons why Erase.bg is the preferred choice for creating transparent backgrounds:
- Efficiency: Erase.bg utilises cutting-edge artificial intelligence algorithms to detect and remove backgrounds from images automatically, saving users time and effort compared to manual editing methods.
- Accuracy: With its advanced AI technology, Erase.bg ensures precise and detailed background removal, maintaining the integrity of the subject and producing high-quality transparent backgrounds.
- User-friendly Interface: Erase.bg features a simple and intuitive interface that allows users of all skill levels to remove backgrounds from images quickly and efficiently.
- Fast Processing: Erase.bg offers fast processing times, allowing users to remove backgrounds from images in seconds, making it ideal for time-sensitive projects.
- Versatility: Erase.bg supports various image formats and works seamlessly with various images, including portraits, product photos, and more.
- Accessibility: Being a web-based tool, Erase.bg can be accessed from any device with an internet connection, making it convenient for users to remove backgrounds on the go.
- Affordability: Erase.bg offers flexible pricing plans to suit different needs and budgets, including a free plan with limited features and paid plans with additional benefits.
Overall, Erase.bg is a reliable and efficient solution for creating transparent backgrounds, providing users with the tools they need to enhance their images and designs effortlessly.
Conclusion
Erase.bg offers a fast, accurate, and user-friendly solution for creating transparent image backgrounds. With its advanced AI technology, intuitive interface, and versatile functionality, Erase.bg is the ideal choice for anyone looking to remove backgrounds and enhance their photos and designs effortlessly.
FAQ's
How do I make my background transparent?
To make your background transparent using Erase.bg, simply upload your image to the website, the AI to remove the background automatically. Once the process is complete, you can download the image with a transparent background.
How do I make a white background transparent?
Here are the steps to make a white background transparent using Erase.bg: Step 1: Upload your image to Erase.bg Step 2: The AI-powered tool will automatically remove the background accurately. Step 3: Download the resulting image with a transparent background in PNG format. That's it! With Erase.bg, you can easily remove the white background and make it transparent without the need for any advanced editing skills.
How do I create a transparent background in Photoshop?
To create a transparent background in Photoshop, open your image and select the Magic Wand tool. Click on the background you want to make transparent and hit the Delete key. Save the image as a PNG or GIF file to preserve the transparency.
Can I make a part of my image transparent in Photoshop?
Yes, you can make a part of your image transparent in Photoshop by using the Eraser or Mask tools. Select the tool you want to use and erase or mask the part of the image you want to make transparent. Save the image as a PNG or GIF file to preserve the transparency.
How do I save an image with a transparent background in Photoshop?
To save an image with a transparent background in Photoshop, go to File > Save As and choose either PNG as the file format. Make sure to check the box next to "Transparency" before saving.
How do I remove the white background from an image in Photoshop?
To remove the white background from an image in Photoshop, select the Magic Wand tool and click on the white background. Press the Delete key to remove the white background. Save the image as a PNG or GIF file to preserve the transparency.
.webp)

.webp)

.webp)

.webp)
.webp)


